


Read the following guide to learn how to set up Facebook conversion tracking to track specific events on your website via Google Tag Manager.
NOTE: Since May 2017 Facebook has enabled an auto setup feature for Google Tag Manager. However the manual method below is still recommended as the best option to use.
By using Facebook conversion tracking it can show you how successful your ads are by reporting on conversion events such as purchases, form submissions and button clicks on your website which happened as a direct result of your ad. You can see this info in your reports. It can also be used to optimise your ad for conversions e.g. It’ll tell Facebook to deliver your ad to people who are most likely to reach the checkout page of your website. In addition to conversion tracking you can also use the Facebook pixel code to build custom audiences and re-target to different audiences based on what users do on your website – all in one pixel!
To get started with event tracking you’ll need to be using the standard Facebook pixel code across the pages of your site before adding in some additional code for the events you want to report on. Note that while the standard code allows you to track page views and create conversions based on using urls, you ‘ll need to create events if you want to report on button clicks or link clicks or revenue from transactions
What you’ll need:
- The standard Facebook Pixel
- Facebook Event Pixel Code
- Google Tag Manager installed on pages of your site with events setup
If you have not setup Google Tag Manger events you may want to get this sorted and working prior to implementing Facebook events. Read more about GTM events here. Keep in mind there is only one Facebook pixel per account. However, you can add standard events or custom conversions to your pixel to report different conversion events.
Step 1 – Create Your Facebook Pixel
This is the standard pixel basecode which will be installed on all pages of your site and will allow you create custom audiences and setup custom conversions that match specific URLs of your site.
WIthin Facebook open your ads manager > Click Tools >Pixels
- Click Create a Pixel.
- Enter a name for your pixel. There’s only one pixel per ad account, so choose a name that represents your business.
- Click Create Pixel. If you work on your website yourself, click Install Pixel Now. If someone else works on your website, click Email Pixel Code. Type in that person’s email address and click Send.
![]()
Here’s an example of the what the standard basecode pixel code looks like which you can get from your account:
Note that your id numbers will be different to this.
Step 2 – Add Facebook Pixel to Website via Google Tag Manager
Take the pixel code above and within Google Tag Manager add this as a new Custom HTML tag. However you will need to make one small tweak to this code by adding the following line of code below, so copy and paste this in as highlighted. (We have to add this for GTM tag sequencing purposes).
window.google_tag_manager[{{Container ID}}].onHtmlSuccess({{HTML ID}});
Set to fire on ‘All Pages’. Then hit publish and put live across pages of your site.
![]()
Step 3 – Implement Facebook Event Tracking Code
To optimize and measure ad campaigns for key conversion actions you’ll need fire a separate piece of code in addition to your standard pixel above, so that you can measure when someone submits a form fill, clicks a button or makes a purchase etc. Below is an example of what the code may look like for a purchase conversion 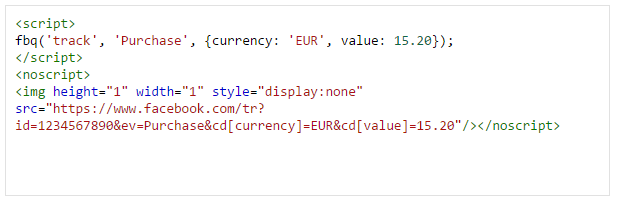
Note how this includes custom parameters for revenue and currency. This will enable revenue details to be passed back to facebook for optimization and reporting purposes. To pull in values dynamically you will need to use either existing GTM variables or use server side script to bring this in. You will see that the info contained within the <noscript> tag also contains the same details as above which is important.
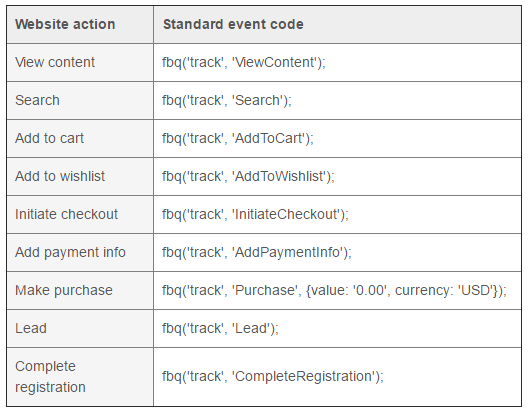
Facebook has 9 standard events you can choose from that are useful for both building audiences and tracking your website conversions back to your Facebook ads. You can however create your own event names if you like.
These are the standard event names
Here’s another example for lead capture. Note this time we add in additional information such as content name and category that we can use to distinguish the lead type. 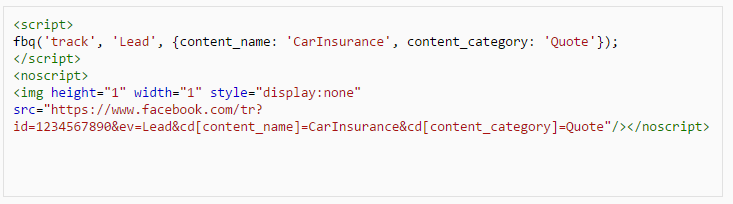
Here is an example of a custom event setup to fire on a Newsletter Signup.
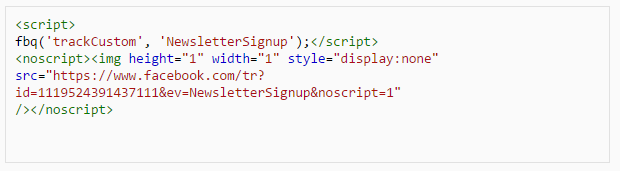
Note how for custom events we use ‘trackCustom’ and then the event name. For standard events this is just ‘track’ followed by event name.
Step 4 – Use Google Tag Manager to Fire the Facebook Event code
To fire the above code, take the code and in Google Tag Manager create another custom HTML tag and paste in the code.
- Under Advanced Settings, select Once per event under Tag firing options.
- Under Tag Sequencing check the box and select your base code tag, to ensure this tag fires after your base code. Important!
- Under Fire On, select the trigger that makes sense for your site.
- Click Create Tag.

Make sure you have a firing rule setup that will fire when this event occurs. I won’t go into detail in this article about how to setup gtm events but you can read up on how to do this here .
1. When you’re done, your Facebook tags list could look something like the example below. Click Publish to push the tags live. 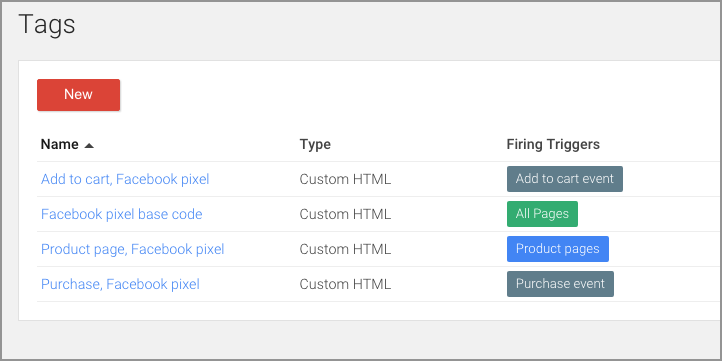
Step 5 – Create A Custom Conversion using Events within Facebook
To use custom events as conversions:
- Implement custom events in your page code
- Go to your Facebook Pixel tab in Ads Manager
- Click Create Conversion > Track Custom Conversions
- In the “Rule” section, click the dropdown and change URL Contains to Events Note: It may take a moment for Events to appear
- In the field underneath the dropdown, select the custom event you want to define as a conversion
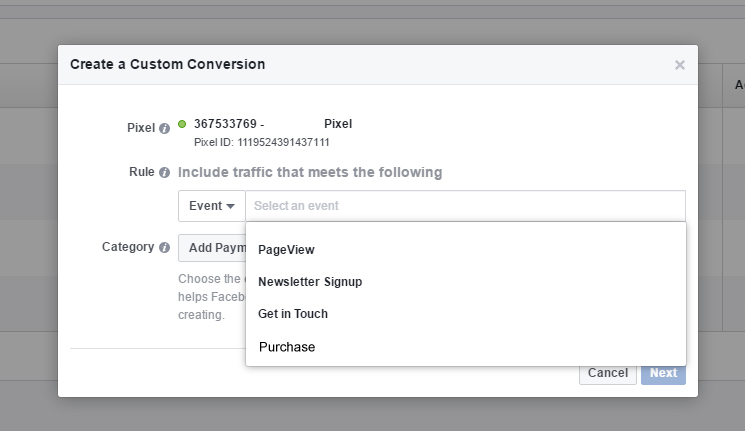
- If the event has sent parameters with it, you’ll be able to select the key pair value. If you do not see it but expect it, make sure the event is set up to send data in parameters. 6. In the “Category” section, click the Choose a Category dropdown and select the most appropriate choice
- Name the custom conversion
You can also add a default conversion value, which we’ll use if values aren’t being sent dynamically as a parameter within the custom event. When a value isn’t set or sent, we’ll set it to 0 by default. View your custom conversions.
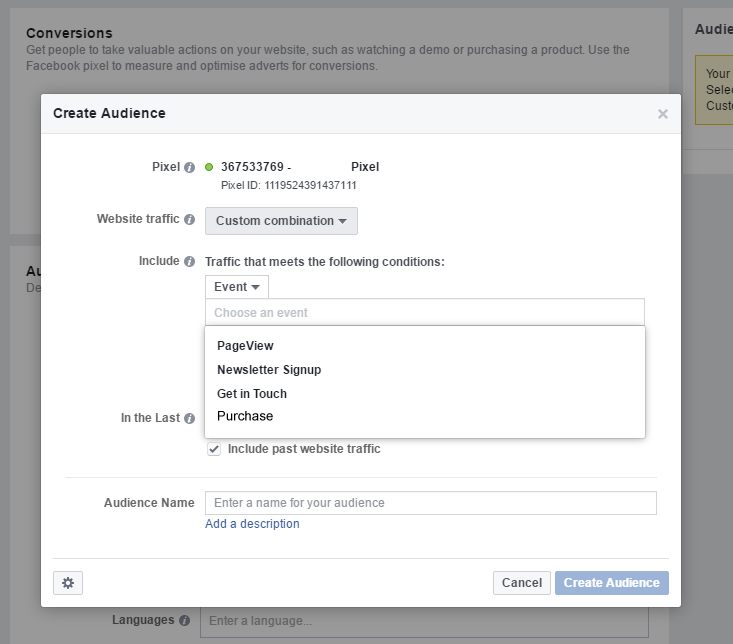
Step 6 – Create A Custom Audience Conversion using Events within Facebook
You can also use your events to create specific audiences for example you could create a list for all those that added something to basket (AddtoCart) but didn’t purchase. Using custom combinations allows you to combine events together to create powerful targeting.
Check if your pixel is working:
Once you’ve uploaded all your events, you should check if your pixel is firing correctly. To check that your pixel is working properly on your live site: 1. Navigate to the web page the pixel was placed on. If it’s working, the pixel will send information back to Facebook and you’ll be able to see activity in the Facebook Pixel page in your Ads Manager. Your pixel’s status will also be set to Active. Keep in mind that the activity column reports all conversion events regardless of whether or not these events are associated with an ad.
![]()
2. If it didn’t work (No activity yet, No recent activity), use the Facebook Pixel Helper to troubleshoot the problem. Keep in mind you have to be using the Chrome browser for it to work. Once the Pixel Helper is installed, a small icon will appear next to your address bar. Navigate to your website in your Chrome browser and click the Pixel Helper icon.
![]()
3. The popup will tell you what pixels were found on the page and whether they have loaded successfully. If not, it’ll give you tips on why it may have failed. Learn more.
Congratulations you can now start running ads on Facebook using conversion optimisation and tracking.
