5 Claude Code Skills Every Business Should Build First
In Part 1 of this guide, I walked you through the journey from Claude Projects on the web to Claude Code on your desktop. If you followed along, you’ve got Claude Code installed, you’ve created a CLAUDE.md file, and you’ve probably had a few useful conversations.
But here’s the question I keep hearing: what do I actually build with it?
In this guide (part 2), I will show you what to build.
Contents
- Introduction
- What Are Claude Code Skills?
- Part 1: Getting Started — Setup and Daily Maintenance
- Part 2: Making It Personal — Your Brand and Voice
- Part 3: Document Templates
- Part 4: The Skill Creator
- What to Build Next
- Getting Started — Your First Week
- Acknowledgements
- Glossary
Introduction
Before I share with you all that I’ve learned in the last month, I should be honest about something. I can’t code. I’m not a developer, I’ve never been a developer, and I don’t plan to become one.
Everything I’ve built in Claude Code—and I’ll show you the scale of it in a moment—I’ve done by following instructions, watching a few videos, a lot of practice, and using my brain for the idea generation.
The actual building happens iteratively.
- I describe what I want, Claude builds it, I tell it what’s wrong, and we go back and forth until it’s right.
- If you know what you want to achieve and you can describe it clearly, Claude Code is the perfect virtual assistant.
- Skills are where Claude Code goes from being a clever chatbot to being a genuine part of your workflow.
My experience of using Claude code in the last month
I’ve built over 80 AI agents and skills at Anicca Digital—for everything from weekly blog production to competitor intelligence reports, branded carousels, client proposals, and daily briefings. Most of them started as something I was doing manually and got tired of repeating.
If you’ve seen what we’re building at Secret-Agents.ai, you’ll know we use n8n for AI agent workflows—form-based automations that run in the cloud. We’re now converting some of those n8n workflows into Claude Code skills as well, because the two are complementary.
Sometimes a form-based agent is the right tool—you fill in the fields, hit go, and it runs. But when you want to just type a request in your own words and have Claude handle it using everything it already knows about your business, skills are the answer.
It’s like having Secret Agents on your laptop.
You don’t need 80 skills. But you do need at least these five. These are the five Claude Code skills I think every business should build first, based on what’s made the biggest difference to how I work.
What Are Claude Code Skills?
A skill is a set of instructions that tells Claude how to do a specific task. It lives in a folder inside your ~/.claude/skills/ directory, and the main file is called SKILL.md—plain text, written in Markdown.
Markdown is a simple text format where you use # for headings, ** for bold, and - for bullet points—nothing more complicated than that.
When you type a slash command like /carousel or /proposal, Claude reads the matching skill file and follows the instructions. It knows what format to use, what tone to write in, what brand colours to apply, and what steps to follow—without you explaining any of it.
The simplest skills are just a few paragraphs. The most complex ones include reference files, Python scripts, and example outputs. But they all start the same way: a SKILL.md file with a name, a description, and a set of instructions.
Here’s what a basic skill folder looks like:
~/.claude/skills/
└── my-skill/
    ├── SKILL.md          ← Instructions Claude follows
    ├── references/       ← Examples, style guides, data
    └── scripts/          ← Python or bash scripts (optional)
If you find yourself typing the same instructions into Claude more than twice, it’s time to make a skill.
Part 1: Getting Started — Setup and Daily Maintenance
Before you start building skills, there are practical things worth getting right. These won’t be in any official documentation, but they’ve made a real difference to how comfortable I am working in Claude Code every day.
Opening Claude Code
If you’ve installed Claude Code as covered in Part 1, the daily routine is simple.
Part 1 used VS Code, but I’ve since switched to Cursor—it’s a similar app that also runs Claude Code. Both work the same way, and everything in this guide applies to either one.
A note on terminology: Throughout this guide, I’ll refer to Cursor because that’s what I use every day. If you’re using VS Code instead, everything works the same way—just substitute “Cursor” for “VS Code” wherever you see it.
If you haven’t set up either yet, go back to Part 1 first. And if any of the technical terms are unfamiliar, there’s a glossary at the bottom covering both parts of this guide.
Save Cursor as a shortcut on your taskbar at the bottom of your screen — just like any other app. Click it to open, and if you’ve been working in it before, it remembers everything you had open. Your tabs, your conversations, your files — all exactly where you left them. I always leave a few tabs open so I can pick up where I was.
To start a new conversation, click the + button in the top right corner. Claude Code opens a fresh chat with the familiar input box at the bottom. Type your first message and press Enter — that first line becomes the tab name, which is why I always start with my naming format (e.g., “Mon 2nd Mar – Blog on writing Claude skills”).
Here’s what a new Claude Code session looks like:

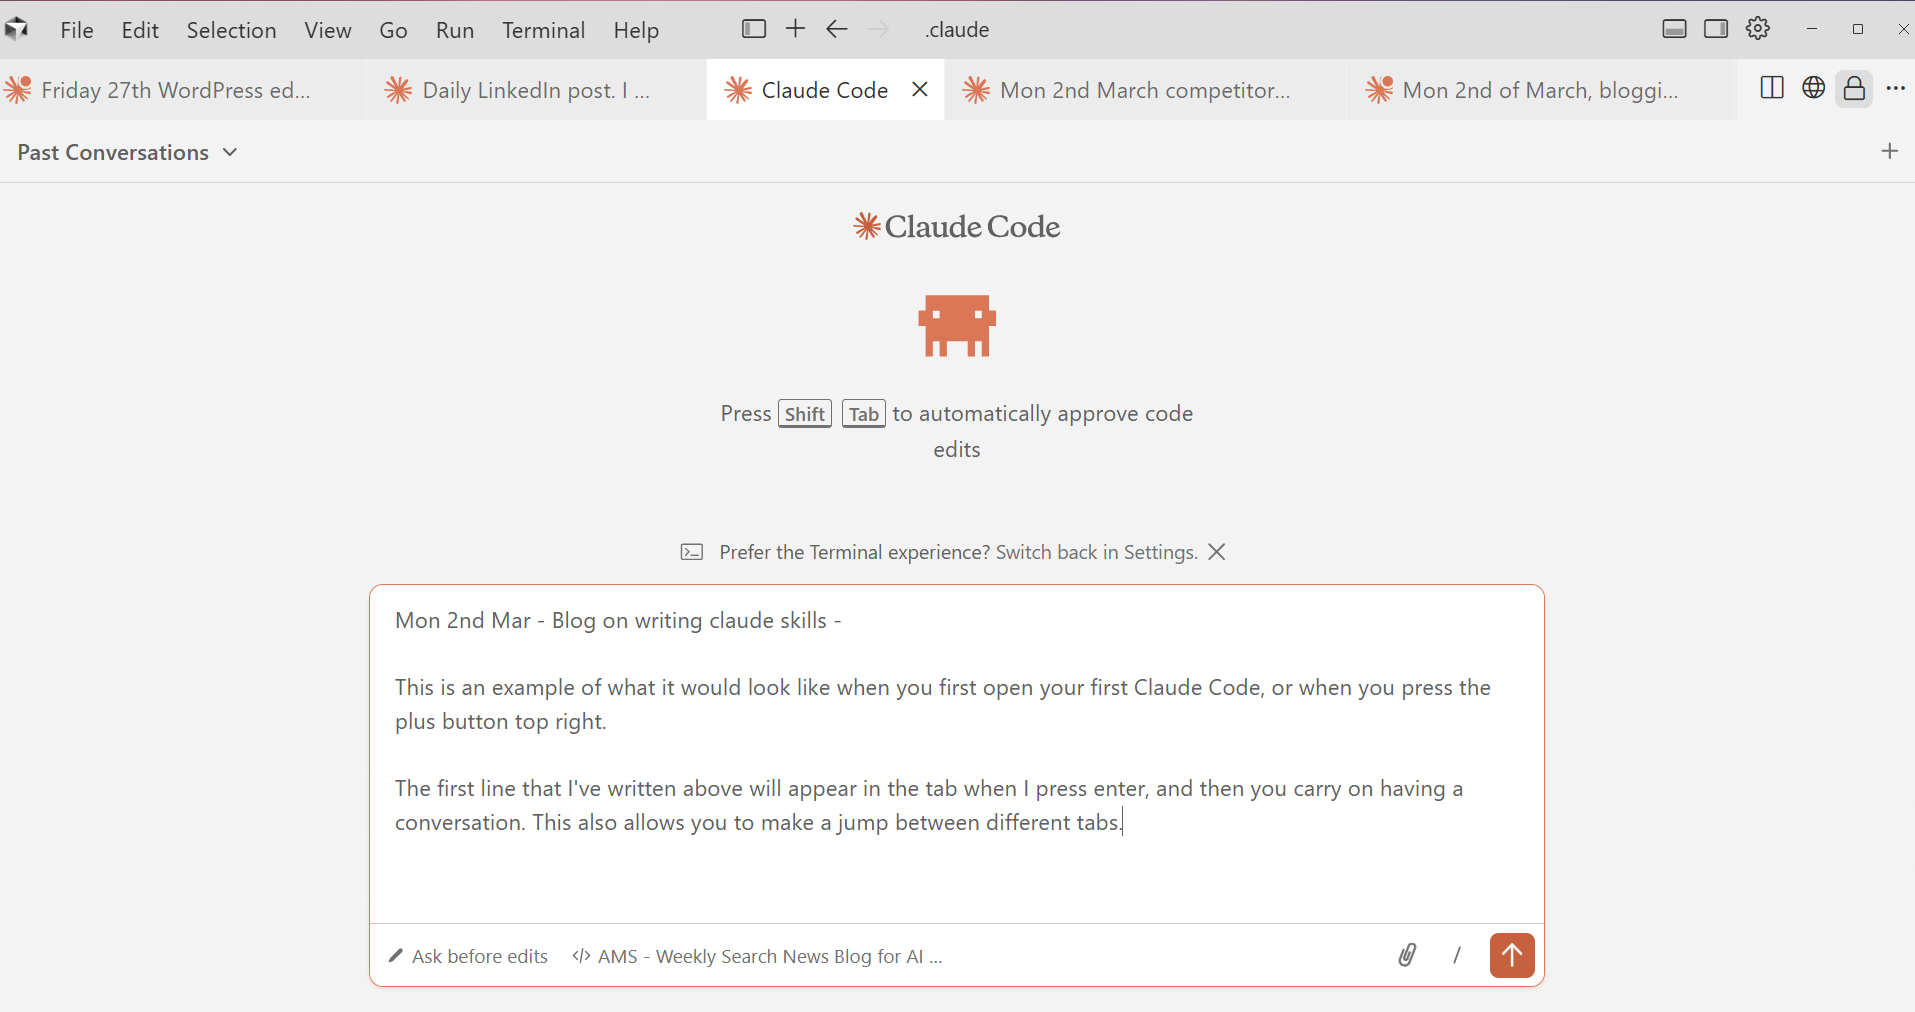
You can see my tabs along the top — each one named with the day, date, and topic. The active tab shows the Claude Code welcome screen with the input box at the bottom. You just type and talk to Claude like a colleague. To run a skill, type / followed by the skill name (e.g., /carousel) and Claude takes it from there.
That’s it. Click the app, click +, and start typing.
Switch to Light Mode
Claude Code defaults to a dark screen — white text on a black background. If you’re not used to working in developer tools or terminals, this is uncomfortable on the eyes. Switch to light mode and it immediately looks more like a normal software interface and less like something from The Matrix.
How to switch: Press Ctrl+Shift+P (this opens a search bar at the top), type “Color Theme”, and pick any light option. I use “Light Modern”. You only need to do this once — Cursor remembers your choice.
Name Your Tabs
You’ll end up with multiple Claude Code conversations running at once, each in its own tab along the top. It looks like any other SaaS tool — but only if you name them sensibly.
I use a simple format: the day, the date, and the topic. For example:
- Monday 2nd MAR – competitor ongoing
- Monday 2nd MAR – blog pipeline
- Monday 2nd MAR – LinkedIn posts
This means I can glance at my tabs and immediately see what each one is about. Without a naming convention, you end up with a row of identical-looking tabs and no idea which is which.
Set Your Permissions
Claude Code asks for permission before it runs commands — and when you’re starting out, you’ll find yourself clicking “yes” dozens of times for things like running a bash command or searching the internet. These are safe operations that aren’t going to do any harm.
Go into your Claude Code settings and set bash commands and web search to auto-approve. This saves an enormous amount of time and stops the constant interruptions. You can always keep more sensitive operations (like writing or deleting files) on manual approval until you’re comfortable.
The permissions live in a file called .claude/settings.json, but you don’t need to find or edit it yourself. Just paste the following into Claude Code and say “Can you set these permissions for me?” — that’s exactly what I did:
{
  "permissions": {
    "allow": [
      "Bash(.*)",
      "WebSearch(.*)",
      "WebFetch(.*)"
    ],
    "deny": []
  }
}
Claude will update the settings file for you. You can add or remove permissions as you get more comfortable — for example, adding "Read(.*)" and "Glob(.*)" so Claude can read and search your files without asking. If the code above looks confusing, just paste it into Claude Code and say “Can you set these permissions for me?” and it will sort it out.
Managing Your Sessions
I typically have around seven tabs open at any one time, but I’m only actively working in one or two. Any more than that and your brain starts to struggle — it’s like having too many browser tabs open. Two screens help enormously here: one for the Claude Code conversation, one for the files you’re reviewing or editing.
Each conversation has a context limit — there’s only so much you can do in a single session before it fills up. Both Cursor and VS Code show a small indicator — in Cursor it’s at the bottom of the chat panel, in VS Code it’s in the status bar at the bottom of the window. It shows how much of that context you’ve used. When it gets to around 90%, it’s time to wrap up and start a fresh session.
Pro tip: talk, don’t type. I dictate almost all of my messages to Claude using Wispr—a voice-to-text tool available as a browser extension and desktop app. It has a three-month free trial, and after that it’s about £15 a month.
It’s significantly faster than typing, but the real benefit is that you naturally provide more detail when you’re speaking. The quality of Claude’s output is directly linked to how much context you give it, and when you talk through what you want, you tend to explain things more thoroughly than when you’re trying to type it out.
If your prompts tend to be short and vague, try dictating them instead—you’ll be surprised how much better the output gets.
Memory and Handovers
This is what makes Claude Code feel like a colleague instead of a tool.
Claude Code has a basic memory system — a file called MEMORY.md that persists across conversations. But the real power comes from building a handover system around it.
Here’s how I use it: every active project has a handover document. It records what’s been done, what’s next, what decisions were made, and any gotchas to watch for. At the end of a working session, I say “write a handover” and Claude updates the relevant document. At the start of the next session — even if it’s a week later — I tell Claude which project I’m working on and it reads the handover. It knows exactly where we left off.
Without handovers, you lose context between sessions. You waste the first ten minutes of every conversation re-explaining what you’re working on. With handovers, Claude picks up mid-sentence. I’ve come back to projects after two weeks and had Claude resume as if we’d spoken yesterday.
What to set up:
- A MEMORY.md file that tracks your active projects and their current status
- A handover document for each major project (just a Markdown file — nothing fancy)
- A habit: say “write a handover” at the end of sessions and “I’m working on [project]” at the start
You can also set up checkpoints during longer sessions — quick progress saves that mean you don’t lose work if something goes wrong. I use a simple script that timestamps and logs whatever note I give it.
Here’s what a simple MEMORY.md looks like — copy this structure and fill in your own projects:
# My Active Projects

| Project | Status | Handover Doc |
|---------|--------|-------------|
| Website redesign | In progress — homepage done, services pages next | website-handover.md |
| Q1 competitor report | Draft complete, client review pending | competitor-handover.md |
| Weekly blog pipeline | Running — 12 posts published so far | blog-handover.md |
And here’s a handover document template — copy this for each new project:
# [Project Name] — Handover
Last updated: [date]

## Current Status
[One sentence — where are we right now?]

## What’s Done
- [Completed task 1]
- [Completed task 2]
- [Completed task 3]

## What’s Next
- [Next step 1]
- [Next step 2]

## Decisions Made
- [Key decision and why]
- [Key decision and why]

## Watch Out For
- [Anything the next session needs to know]
- [File paths that changed, deadlines, dependencies]
When you start a new session and say “I’m working on the website redesign”, Claude reads this file and knows exactly where you are. No re-explaining needed.
GitHub — Your Backup
If you set up GitHub in Part 1, this is where it pays off. GitHub is your backup system — every time you commit and push, your skills, memory files, handover documents, and configuration are all saved and versioned in the cloud. If something goes wrong, you can always go back to a previous version.
You don’t need to learn Git commands. Just say “commit and push to GitHub” and Claude handles it. I do this at the end of every session so nothing is lost overnight. Think of it the same way you’d think about saving a Word document to OneDrive — except GitHub keeps every version, not just the latest one.
I’ve even set up a scheduled task that runs at 7am every morning, so even if I’m not awake, Claude automatically backs up all the work from the previous day. The reason I set it at that time is because I never know what time I’m going to finish, so this at least guarantees that everything is saved. I won’t explain how to set that up in this blog, but it’s coming in a future post on more advanced configuration.
Wrapping Up a Session
Here’s the order I follow when it’s time to wrap up:
- Write a handover — before you do anything else, say “write a handover” so Claude saves your progress to the handover document. This is the most important step.
- Save any skill changes — if you’ve been building or editing a skill during the session, ask Claude to save those changes too.
- Commit to GitHub — say “commit and push to GitHub” to back everything up.
- Open a new tab with the correct naming format (e.g., “Monday 2nd MAR – competitor ongoing”) and tell Claude which project you’re working on. It reads the handover and picks up where you left off. Make sure the new session is working before you close the old one.
- Close the old tab — once you’re happy the new session has everything it needs, close the old one so your workspace doesn’t get cluttered.
Part 2: Making It Personal — Your Brand and Voice
Once you’ve got your daily setup right, the next step is making Claude’s output look and sound like it came from your business — not from a generic AI.
Your Brand Bible
This is the foundation everything else builds on.
Your brand bible tells Claude your fonts, colours, logo file paths, tone of voice, and formatting standards. Once it’s set up, every report, carousel, proposal, and email Claude produces follows the same visual identity — without you checking or correcting it.
At Anicca Digital, our brand bible specifies Outfit as our font (never Arial), navy #1A2332 as our primary colour, cyan #4BCCFF as our accent, and exactly which logo to use on dark versus light backgrounds. Every skill we’ve built inherits these standards automatically.
Without a brand bible, Claude will default to whatever looks reasonable. You’ll spend time fixing fonts, swapping colours, and reformatting headers. With one, your output is consistent from day one — and anyone on your team using the same skills gets the same result.
One thing that makes a massive difference is providing examples of what you’ve already created. If you’ve got existing documents, presentations, carousels, or reports that look the way you want them to, save them as seed images—screenshots or exported files that Claude can use as a visual reference.
You can create these in Canva or Figma, or just screenshot something you’ve already produced. Put them in a references folder alongside your skill, and Claude will match the layout rather than guessing from a text description. The more examples you give it, the closer the output gets to what you actually want.
Here’s what the branding section of a CLAUDE.md file looks like — copy this and replace with your own details:
## Branding

- **Company Name**: [Your Company] (correct spelling)
- **Font**: [Your font] (all documents, reports, presentations)
- **Primary Colour**: [colour name] [hex code]
- **Accent Colour**: [colour name] [hex code]
- **Light Background**: [hex code]

## Logos
- Dark backgrounds: C:\Users\YourName\Documents\Logos\company-logo-white.png
- Light backgrounds: C:\Users\YourName\Documents\Logos\company-logo-dark.png

## Document Defaults
- Reports and presentations: A4 landscape
- Proposals and letters: A4 portrait
- Carousels: 1080x1350 portrait (LinkedIn) or A4 portrait (PDF)

## Tone of Voice
- [Conversational / Professional / Technical — describe how you want to sound]
- British English spelling
- [Any phrases or words to avoid]
This is just plain text — you type it once into your CLAUDE.md file, and Claude reads it at the start of every conversation. No code, no configuration files, just clear instructions written in a way that both you and Claude can understand.
Once you’ve built your brand bible, it transfers across everything you do — blogs, proposals, order confirmations, carousels, audit reports, ebooks. In the same way you’d have a brand toolkit for your designers, this is the equivalent for Claude. Build it once, use it everywhere.
Organising Your Files
One thing to get right early: Claude Code doesn’t work with file uploads the way Claude Projects does. Instead, it reads files directly from your computer. That means you need a sensible folder structure on your machine — a place for logos, a place for documents, a place for client work. Think of it like organising a shared drive.
When you want Claude to use a file — a logo, a photo, a data file — you just right-click it in File Explorer, copy the path, and paste it into your conversation. That’s it. Once you’re used to it, it’s actually faster than uploading. And if Claude has accessed a file before, you can just ask it to find it.
Why Base64 Matters for Images
When Claude embeds an image like a logo into a document, it converts it to something called base64—which looks like a long string of characters. This sounds technical, but what it means in practice is that the logo is embedded directly inside the document file.
It gets the colours right, it gets the proportions right, and it works every time you open the file. If you’ve ever pasted an image into a Word document and had it come out stretched, pixelated, or with the wrong background—base64 solves that.
HTML First, Then Convert
One thing I’ve learned from building all of these skills: Claude is exceptionally good at creating HTML. Beautiful, pixel-perfect HTML pages that can be a report, a carousel, a slide deck, or even a marketing image. My approach now is to always get the HTML version perfect first — layout, colours, fonts, spacing, everything exactly right — and then convert to whatever format I need. A skill to convert HTML to Word or PowerPoint is genuinely useful once you’re producing documents regularly.
Your Voice
Everyone writes differently. Claude doesn’t know how you write unless you show it.
A voice skill captures your writing style — your sentence length, your word choices, your formatting habits, the phrases you use and the ones you’d never use. It’s the difference between Claude producing generic LinkedIn content and Claude producing posts that sound like you actually wrote them.
My LinkedIn skill includes examples of real posts I’ve written, annotated with notes on why each one works. It knows I write short sentences. It knows I name people and companies. It knows I don’t say “unpacking” or “game-changer” or “here’s the deal” — because those are LinkedIn clichés, and I’d never say them in person.
If you’re using AI for content — LinkedIn posts, emails, blog drafts, client communications — and the output doesn’t sound like you, it’s creating more work, not less. You end up rewriting everything anyway. A voice skill means the first draft is already 80-90% right.
What to include in your voice skill:
- 5-10 examples of content you’ve actually written (not aspirational — real)
- Annotations on each example: what makes it yours, what patterns to follow
- A list of banned phrases — words and structures you’d never use
- Formatting preferences: emoji use, hashtag style, bullet point format, CTA patterns
- Different post types if you write different kinds of content (event promotion vs thought leadership vs news round-ups)
This skill gets better over time. The more examples you give it, the better it gets. And when Claude produces something that doesn’t sound right, tell it why — then add that feedback to the skill so it doesn’t happen again. Your voice skill is a living document.
Part 3: Document Templates
If your business produces any kind of document for clients — or even internally — you need template skills. Start with the everyday documents you create most often, not the big strategic ones.
Here are the document templates I use regularly at Anicca:
| Document | What it does | Output format |
|---|---|---|
| Order confirmations | Professional confirmation with scope, pricing, and terms | .docx (Word) |
| Proposals | Three types — campaign, discovery, multichannel — each with budget tables and timelines | .docx (Word) |
| NDAs | Non-disclosure agreements with correct legal formatting | .docx (Word) |
| LinkedIn carousels | Branded slide decks for news round-ups and weekly updates | HTML → PDF |
| Blog posts | Full articles with SEO formatting, table of contents, and reading time | HTML → WordPress |
| GEO audit reports | AI visibility reports showing how brands appear in AI search | HTML (A4 landscape slide deck) |
| Blog featured images | Branded header images with headline text and illustrations | HTML → PNG |
These are the bread-and-butter documents that go out every week. Each one follows the same structure and brand formatting every time, no matter who runs the skill.
A template skill defines the structure, layout, and visual format of a specific document type. When you run it, Claude produces a complete, branded document — not a rough draft you need to redesign.
What to include in a template skill:
- Document structure: sections, headings, page layout
- Brand formatting: fonts, colours, logo placement (this comes from your brand bible automatically)
- Content rules: what goes in each section, how detailed, what tone
- Output format: HTML for slide decks, .docx for Word documents, PDF for print
- Example output (even one example makes a massive difference to quality)
Start with the document you produce most often. Get that one right, then build the next.
Once you’ve got the everyday documents working, you can move on to more detailed strategic deliverables — things like CRO audits with scored frameworks, competitor intelligence reports, and content audits. These are more complex to build, but they follow exactly the same principle: define the structure, set the brand rules, and let the skill do the heavy lifting.
Pro tip: create seed images first. If your documents need a specific visual layout — a carousel slide, a report cover, an infographic — it’s worth creating what you want it to look like in Canva or Figma before you build the skill. These become your seed images: visual references that show Claude exactly what the output should look like. You can include them in the skill’s references folder. This speeds up the process enormously because Claude can see the target rather than guessing from a text description. If design isn’t your strength, get someone else to create the templates and then you convert them into seed images for the skill.
How to QC the output: One thing I’ve learned is that when Claude produces a document and it doesn’t look quite right, don’t try to describe what’s wrong yourself. Instead, show Claude the original template or seed image and ask it to critique its own output against it. Claude compares pixel by pixel — exact positions, spacing, font sizes, colours — whereas when you describe the problem, everything is relative and has to be interpreted. “Move the logo up a bit” could mean anything. Claude comparing two images side by side is precise.
This is particularly important with visual output like carousels, report layouts, and images, where it’s very difficult to accurately describe how far to move an element within a frame. With text it’s easier — you can just copy and paste the correct wording. But for layout and design, let Claude do the critique first, then you agree or edit its findings, and the next version will be significantly closer to what you want.
The test is simple: could you hand this skill to someone else on your team and be happy with what they produce? If yes, you’ve got a good template.
Part 4: The Skill Creator
This is the meta-skill — the one that lets you build all the others.
A skill creator skill teaches Claude how to write new skills. It understands the SKILL.md format, the folder structure, how to write good metadata so Claude knows when to trigger the skill, and how to break instructions into the right level of detail.
Once you have this, you can say “create a skill for writing case studies” or “turn this process into a skill” and Claude will produce a properly structured skill file you can start using immediately.
Building skills manually means reading documentation, getting the format right, testing, and iterating. A skill creator shortens that to a conversation. You describe what you want, Claude builds the skill, you test it, and you refine it together.
How it works:
Skills have three levels of content:
- Metadata (name and description) — always loaded, helps Claude decide when to trigger the skill
- SKILL.md body — the full instructions, loaded when the skill is triggered
- Bundled resources (references, scripts, assets) — loaded on demand when Claude needs them
A good skill creator helps you think through each level: What does Claude need to know upfront? What can it load later? What should be in a reference file rather than the main instructions?
Here’s what a simple SKILL.md file looks like — this one creates a weekly email summary:
---
name: weekly-summary
description: >-
  Create a weekly summary email for clients. Use when the user says
  "write a weekly summary", "client update", or "/weekly-summary".
---

# Weekly Summary Skill

## What It Does
Creates a professional weekly update email for a client, summarising
work completed, results achieved, and next steps.

## Steps
1. Ask which client the summary is for
2. Read the client's handover document for current project status
3. Write the email using the format below
4. Apply brand formatting from CLAUDE.md

## Email Format
- Subject line: [Client Name] — Weekly Update [Date]
- Opening: 2-3 sentence summary of the week
- Section 1: What we completed
- Section 2: Results and metrics (if available)
- Section 3: What's planned for next week
- Sign-off: Use the team member's name and company name

## Tone
Professional but warm. No jargon. Keep it under 300 words.
That’s it — a name, a description that tells Claude when to use it, and plain English instructions. No code required.
Anthropic publishes an official skills repository on GitHub with examples and templates. Between that and a skill creator skill, you have everything you need to build your own library.
Pro Tip: Convert What You’ve Already Built
You don’t have to start from scratch. If you’ve been using AI for a while, you’ve probably already got material that can be converted into skills:
- Custom GPTs — Open your GPTs in ChatGPT, copy the instructions and any example outputs, and ask Claude to convert them into a SKILL.md format. Most GPTs translate directly into Claude Code skills.
- Claude Projects — If you’re using Claude Projects on the web, ask Claude to take your custom instructions and knowledge files and package them as a skill. You can then download the skill and drop it into your desktop skills folder.
- Long chat histories — If you’ve had a really productive conversation with any AI tool — one where you refined a process, worked through a complex task, or built something iteratively — get that conversation summarised and converted into a skill. All that learning is sitting in your chat history. Turn it into something reusable.
This is one of the fastest ways to build up your skill library. Instead of creating everything new, you’re packaging work you’ve already done.
If you find yourself repeating a process more than twice, it should be a skill. The skill creator makes building them easy.
What to Build Next
Once you have these in place, you’ll naturally see what’s missing. Here’s where most people go next:
| If you do this regularly… | Build this skill |
|---|---|
| Write a weekly blog or newsletter | A content pipeline (discovery → writing → formatting → publishing) |
| Send proposals or quotes to clients | A proposal generator with your standard pricing and terms |
| Run audits or assessments | A scored audit template with weighted criteria |
| Create social media content | A carousel or image generator with your brand assets |
| Onboard new clients | A discovery questionnaire that outputs a structured brief |
| Monitor competitors | A competitor analysis skill that pulls and formats data |
| Brief your team on projects | A daily briefing skill that pulls from calendar, email, and project notes |
The pattern is always the same: identify something you do repeatedly, document how you do it, and turn those instructions into a skill.
Getting Started — Your First Week
If you’ve read Part 1 and have Claude Code installed, here’s a realistic path for your first week:
Day 1: Get comfortable
- Open Cursor and click the + button to start a new Claude Code chat
- Switch to light mode
- Set your permissions to auto-approve bash and web search
- Have a few conversations — ask Claude to read a file, summarise it, create something simple
Day 2: Write your brand bible
- Add your fonts, colours, logos, and tone to your CLAUDE.md file
- Ask Claude to create a simple document and check whether it follows your brand
- This takes 15 minutes and improves everything Claude produces from that point on
Day 3: Set up memory
- Create a MEMORY.md file with a status table of your active projects
- At the end of the day, say “write a handover” and check what Claude produces
- Start naming your tabs with the day-date-topic format
Day 4: Build your voice skill
- Gather 5-10 examples of content you’ve written (LinkedIn posts, emails, blog intros)
- Create a skill folder with a SKILL.md and a references file containing your examples
- Test it — ask Claude to write a post and see if it sounds like you
Day 5: Create your first document template
- Pick the document you produce most often — a report, proposal, or presentation
- Define the structure, branding, and content rules in a SKILL.md file
- Test it, refine it, and you’ve got a reusable template
You don’t need to follow this exact schedule. Start with whatever’s most useful to you. The important thing is to start building, test as you go, and refine based on what actually works.
Acknowledgements
I wouldn’t be where I am with Claude Code without a few people who got me into this early.
Mike Rhodes runs AdsToAI, and it’s been genuinely useful for learning how to build with AI tools in a practical, hands-on way. Holly Kelly went on one of Mike’s first challenges and created the first skill in Claude Projects, where we were using skills before Claude Code existed. She was the one who pointed out that you could take the same approach in Claude Code — and that’s essentially what kicked all of this off. Darren Wynn and I have been building out skills at Anicca ever since, and we’re now at 80+.
I should also mention a couple of people who are smashing it with a different approach. Tony Hancock from Skintique and Ahmed Mukhtar from Agenix have been building apps and agents using OpenClaw (the open-source AI agent that went viral earlier this year). We’re not using OpenClaw at Anicca yet — we’re still concerned about the security implications, and the kind of work we do needs a lot more iteration and back-and-forth than OpenClaw currently supports. But it’s worth keeping an eye on, and Tony and Ahmed are proof of what’s possible.
Glossary
This glossary covers terms from both Part 1 and Part 2 of this guide.
- Anthropic — The AI company that makes Claude, founded by former OpenAI researchers
- Artifact — A piece of content Claude creates in the web interface (document, code, table, etc.) that can be published as a web page
- Base64 — A way of encoding images as text characters so they can be embedded directly inside a document file, ensuring colours and proportions stay accurate every time
- Brand Bible — A set of rules defining your visual identity (fonts, colours, logos, tone) that Claude follows across all output
- ChatGPT — OpenAI’s AI chatbot — the most widely known AI assistant. Claude is made by a different company (Anthropic)
- Claude Code — An advanced AI tool from Anthropic that acts like a developer assistant. It can read your whole project, create and edit files, run commands, and make changes across multiple files automatically. When you use Claude in Cursor, you’re taking these capabilities and using them within Cursor’s user-friendly interface
- CLAUDE.md — A plain text file containing your instructions for Claude Code, placed in your project folder — Claude reads it automatically at the start of every conversation
- Context Limit — The maximum amount of conversation Claude can hold in one session — shown as a percentage indicator at the bottom of your Cursor or VS Code window. When it reaches around 90%, it’s time to wrap up and start a fresh session
- Context Window — The amount of conversation and information Claude can hold in its memory during a single session. Think of it like a desk — there’s only so much you can spread out before you need to tidy up and start fresh
- Cursor — A code editor built on top of VS Code with AI deeply integrated — it supports chatting, editing, and generating content within a familiar, user-friendly interface. This is the one I use daily and the one this guide assumes you’re using
- Custom Instructions — Rules and preferences you set for a Claude Project on the web
- Extension — A plugin you install inside VS Code or Cursor to add extra features — Claude Code is installed as an extension
- GitHub — A cloud service that stores and backs up your files with version history — think of it like OneDrive or Google Drive, but it keeps every version of every file so you can always go back. Claude can commit and push to GitHub for you
- GPTs — OpenAI’s shareable prompts with uploaded files, available in ChatGPT
- Handover Document — A Markdown file recording project progress, decisions, and next steps — used to maintain context between sessions so Claude picks up where you left off
- HTML — The language used to create web pages — Claude is very good at producing pixel-perfect HTML that can then be converted to other formats like Word or PDF
- Knowledge File — A document you upload to a Claude Project so Claude can reference it during conversations — style guides, data files, reference material
- Markdown (.md) — A simple text format that uses symbols for formatting (# for headings, ** for bold, – for bullet points)
- Marketplace — An online store within VS Code or Cursor where you browse and install extensions — similar to an app store
- MCP (Model Context Protocol) — A way to connect Claude Code to external tools and services like browsers, calendars, and databases
- MEMORY.md — A persistent file in Claude Code that stores information across conversations — your project dashboard that tracks what you’re working on
- Metadata — The name and description at the top of a SKILL.md file that tells Claude when to use the skill
- Opus 4.6 — Anthropic’s most capable AI model, with extended thinking and a large context window
- Prompt — The text you type to tell an AI what you want it to do — a question, an instruction, or a description of what you need
- Reference Files — Supporting documents inside a skill folder (examples, style guides, seed images) that Claude reads when running the skill
- Seed Image — A visual reference (screenshot, Canva design, or mockup) included in a skill folder so Claude can see what the output should look like, rather than guessing from text descriptions alone
- settings.json — A configuration file where you set permissions for what Claude can do automatically (e.g., run commands, search the web) — you can ask Claude to update this for you
- Skill — A reusable set of instructions stored as files in your skills folder, triggered by slash commands or automatically by Claude
- SKILL.md — The main instruction file inside a skill folder — written in Markdown with a name and description at the top
- Slash Command — A shortcut (like /carousel or /proposal) that triggers a specific skill in Claude Code — you type it at the start of your message
- Terminal — A text-based interface on your computer where you type commands instead of clicking buttons. On Windows it’s called PowerShell or Command Prompt, on Mac it’s called Terminal. You may need it for installation, but not for daily use
- Token — The unit AI uses to measure text — roughly one token per word. Your context window has a token limit, which is why sessions eventually fill up
- Voice Skill — A skill that captures your personal writing style, with examples and rules, so Claude produces content that sounds like you
- VS Code — A free, customisable digital workspace made by Microsoft for writing and editing files. It supports plugins but doesn’t write code for you. Think of it as a smart notebook that Claude Code can plug into

Thursday AI Club
A hands-on AI club for marketers and managers. Fortnightly 3-hour sessions: Hour 1 is an open Q&A on any AI question; Hours 2-3 split into a workshop track (for newbies) and an advanced track (live demos and deeper questions).
Led by Ann Stanley, James Allen.
Membership: £40/month or £400/year
Join the Thursday AI Club →