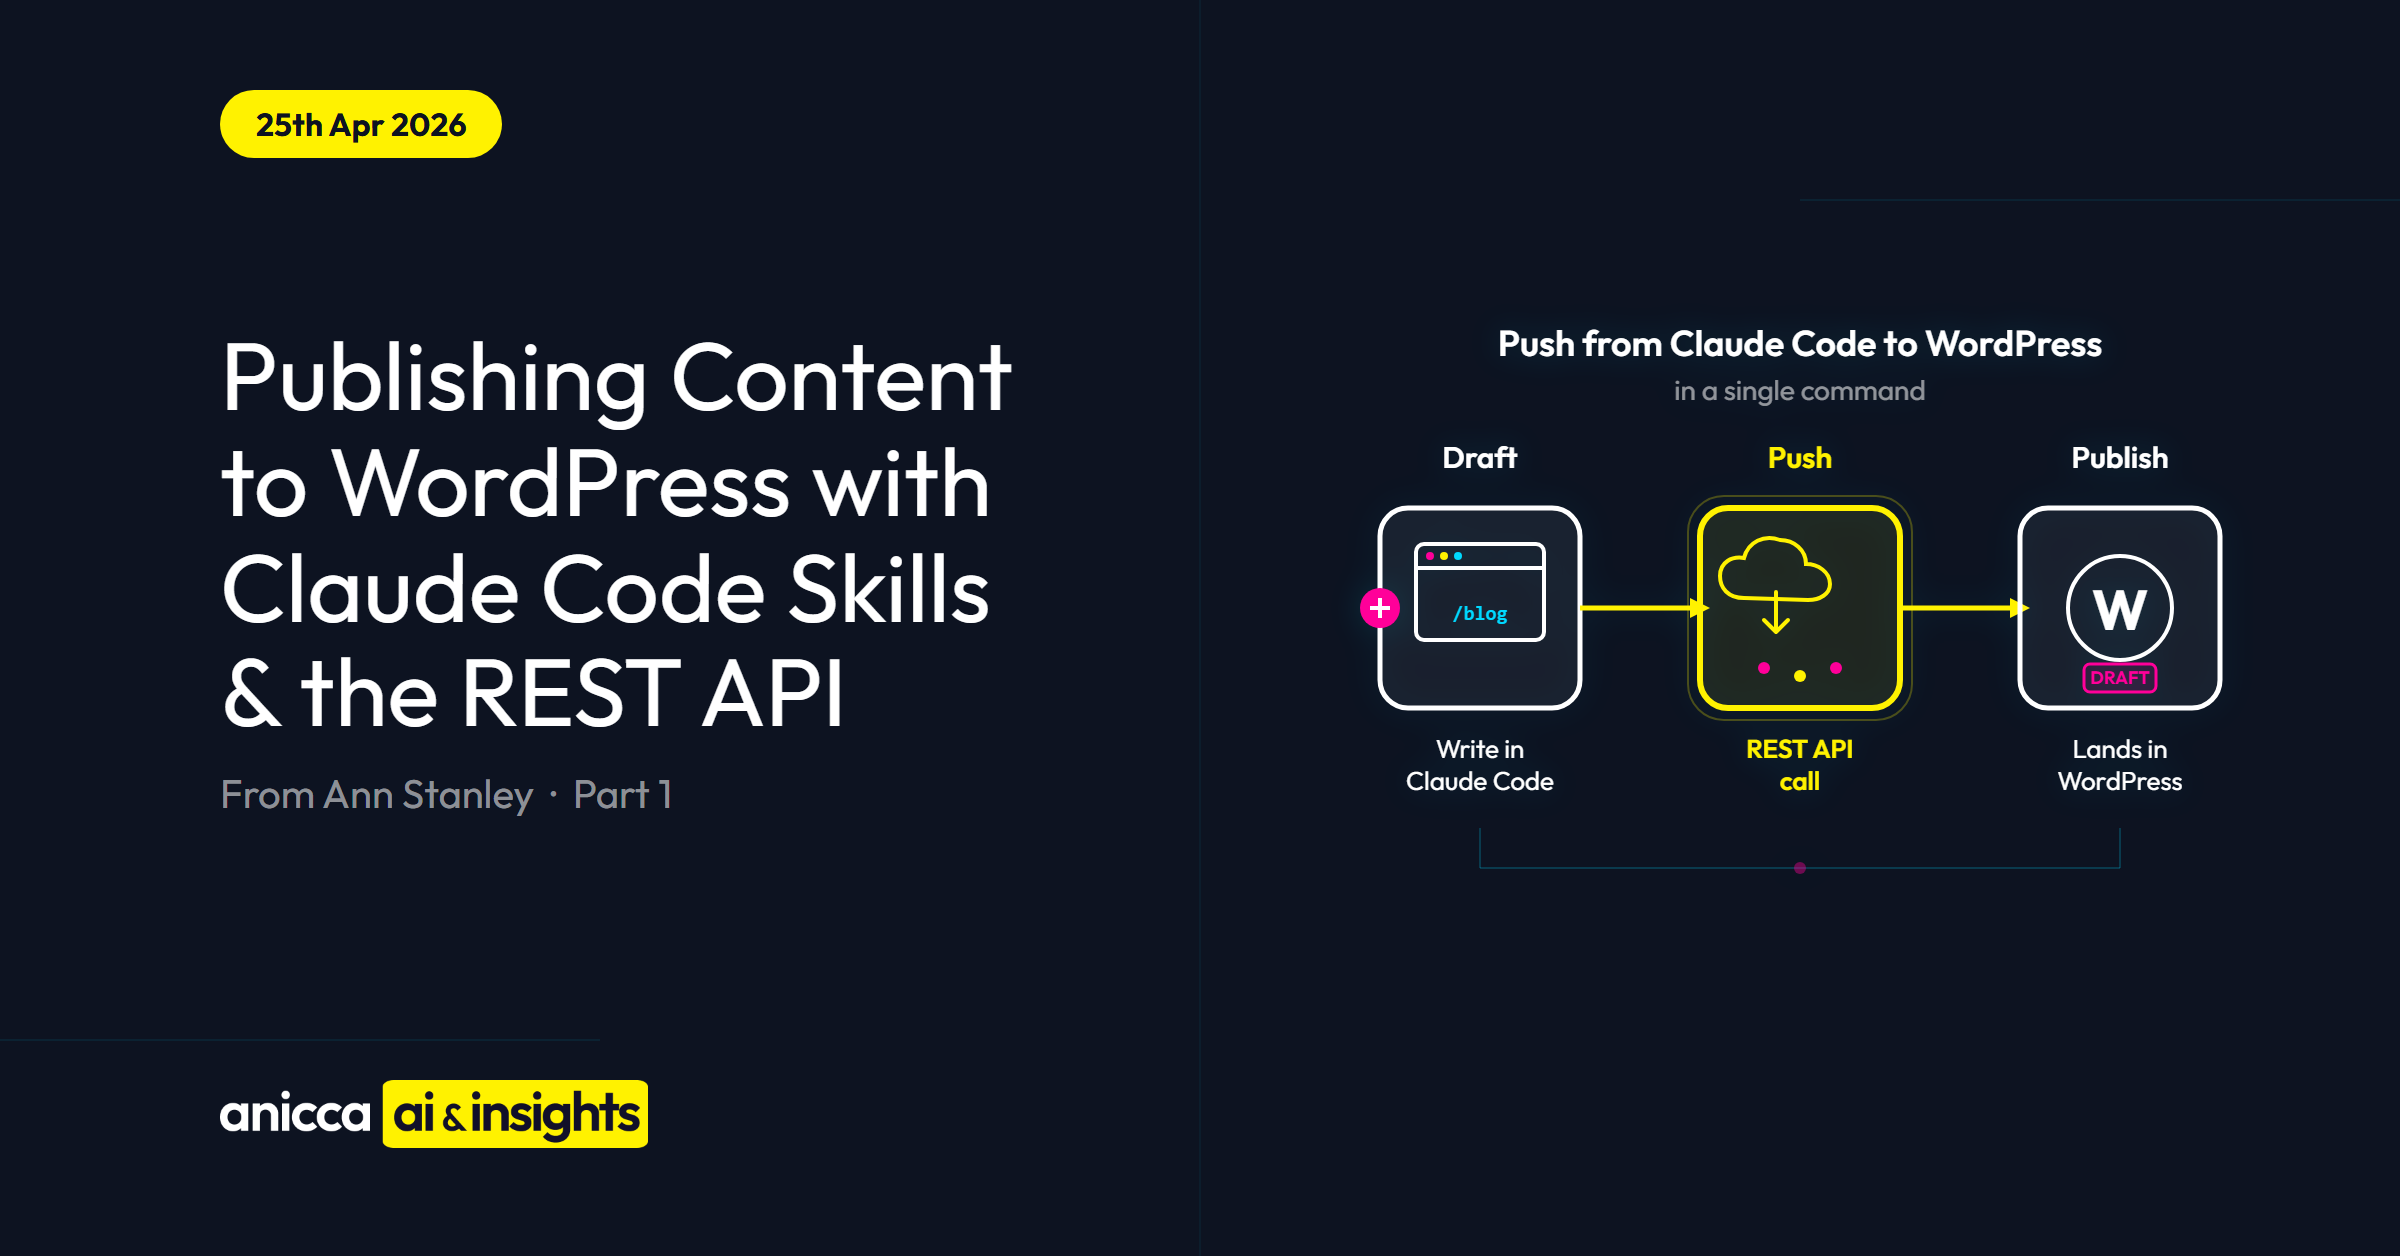
Publishing Content to WordPress with Claude Code Skills & the REST API (Part 1)
This guide shows marketers how to push a finished blog post (headings, paragraphs, featured image, categories) straight from a Claude Code session to their WordPress site as a draft, using the WordPress REST API. Thus, avoiding the need for you to manually paste into the WordPress editor (Gutenberg, or other CMS like Elementor).
One Claude Code instruction does the upload.
- Who it is for: marketers and business owners who publish at least one blog a week on WordPress.
- What you will set up (once):
- WordPress Application Password, which gives you access to your WordPress account.
- .env file with three keys, where you store your confidential information on your local laptop so it can be accessed by Claude Code.
- Reusable Claude Code skill, typically called
wp-content-publish, which holds your pre-built instructions on how to do this task.
- Setup time: about 15 minutes, one-off.
- Time saved per blog: roughly an hour, every time, on the upload step alone.
- Works with: You will need to use Claude Code (from Anthropic), via Claude Desktop, or Claude Code inside Cursor (a code editor). You cannot use ChatGPT, Claude.ai or Gemini, those browser tools cannot call the WordPress REST API or access your local drive, where your skill is saved.
I have provided a glossary at the end of this blog, so that you can understand all the new terms that we may use in this article.
Most guides on AI and content stop before the upload step. This one starts there. It walks through the exact workflow I use every week to push our two weekly AI-marketing blogs onto anicca.co.uk as drafts, ready for final review and publishing.
The upload step of my workflow saves me about an hour per blog. At two blogs a week that is two hours back every week, just from the upload. The other stages (skill-driven drafting, seeded featured image, LinkedIn carousel, newsletter version) each save more on top and are the subject of future guides in this Claude Code series.
If you are not sure whether you are set up for Claude Code, or which version of it to start with, our free Claude Code Implementation Guide walks through the options in full.
Table of Contents
1. Why I Now Use Claude Code’s Skills to Publish and Promote My Content
2. The Whole Content Creation Process and the Role of AI in Publishing to WordPress
3. What You Need to Set This Up in Claude Code and WordPress
3.1 A WordPress Application Password
4. Generating a WordPress Application Password
5. The .env File: Where All Your Confidential API Access (keys) Live
6. Pushing the post to WordPress as a draft
6.2 Why you need to ask for separate Gutenberg blocks
6.3 Review the draft in the theme, iterate, then move on
7. Creating and publishing the featured image
8. Pushing a Page into WordPress (Same Recipe, Different URL)
9. What You Still Have to Edit Directly in WordPress
10. When the WordPress Push Goes Wrong (the Four Common Errors)
10.4 Error 500 Internal Server Error
1. Why I Now Use Claude Code’s Skills to Publish and Promote My Content
Until three months ago, producing and promoting a single weekly blog at Anicca Digital meant bouncing between four or five different tools.
The traditional blog publishing and promotion workflow
- I have been using AI to help me draft the content for over 3 years.
At different times I have used different techniques, depending on the type of post. The weekly news round-ups, which need a fresh scrape of other sites every week, used n8n with prompts stitched together.
The thought-leadership and topic-based posts (a piece on a recent technology update, say, or a product guide) used Claude Projects on the web, my blog writer on secret-agents.ai, or a Custom ChatGPT I built two years ago.
Whichever tool produced the draft, it always landed in Word, where I edited it into my voice and structure. Word was where the blog actually got made.
- The rest of the blog creation process.
Once the Word draft was signed off, the rest of the workflow began: Figma and a designer for the featured image, then WordPress to paste it all in and publish.
- What else do I need to promote the blog on LinkedIn?
Once the post was live, the promotional work started: a short-form LinkedIn post, a LinkedIn carousel (back to Figma, back to the designer), then a separate document for the LinkedIn newsletter version. Every sentence I changed in the Word draft meant reopening half of those tools again.
So how am I using AI differently from before?
What changed for me was not the use of AI for content creation. It was using AI for the rest of the process.
This was made possible by using Claude Code on my desktop, where I was able to use task-specific Claude Code Skills, to replicate or replace the other tools into one AI Operating System (AI-OS).
What is a skill?
A skill is a reusable instruction set (or recipe) that holds your brand guidelines, voice rules, and detailed prompts, so Claude loads them automatically from your desktop every time you invoke the skill.
You never re-explain the instructions, although you can improve them and modify them over time.
Different blog types (news round-up, product walkthrough, audit write-up) get their own skill, all sharing the same brand.
Our free Claude Code Implementation Guide walks through skills, slash commands, and how to build your own.
2. The Whole Content Creation Process and the Role of AI in Publishing to WordPress
The whole workflow (writing the blog, generating the image, pushing to WordPress, producing the promo) runs in a single Claude Code session. The same is true whether you are using Claude Desktop or Cursor.
Most of the process is iterative (you would not expect the first draft of anything, words or image, to be right first time). You do not move through it step-by-step in a single pass; you loop back until the content and image are right, then push. Each stage is driven by a Claude Code skill, a reusable instruction set that holds my brand guidelines, voice rules, and the detailed prompts that produce on-brand output without my re-explaining them every week.
The diagram below shows the full flow.
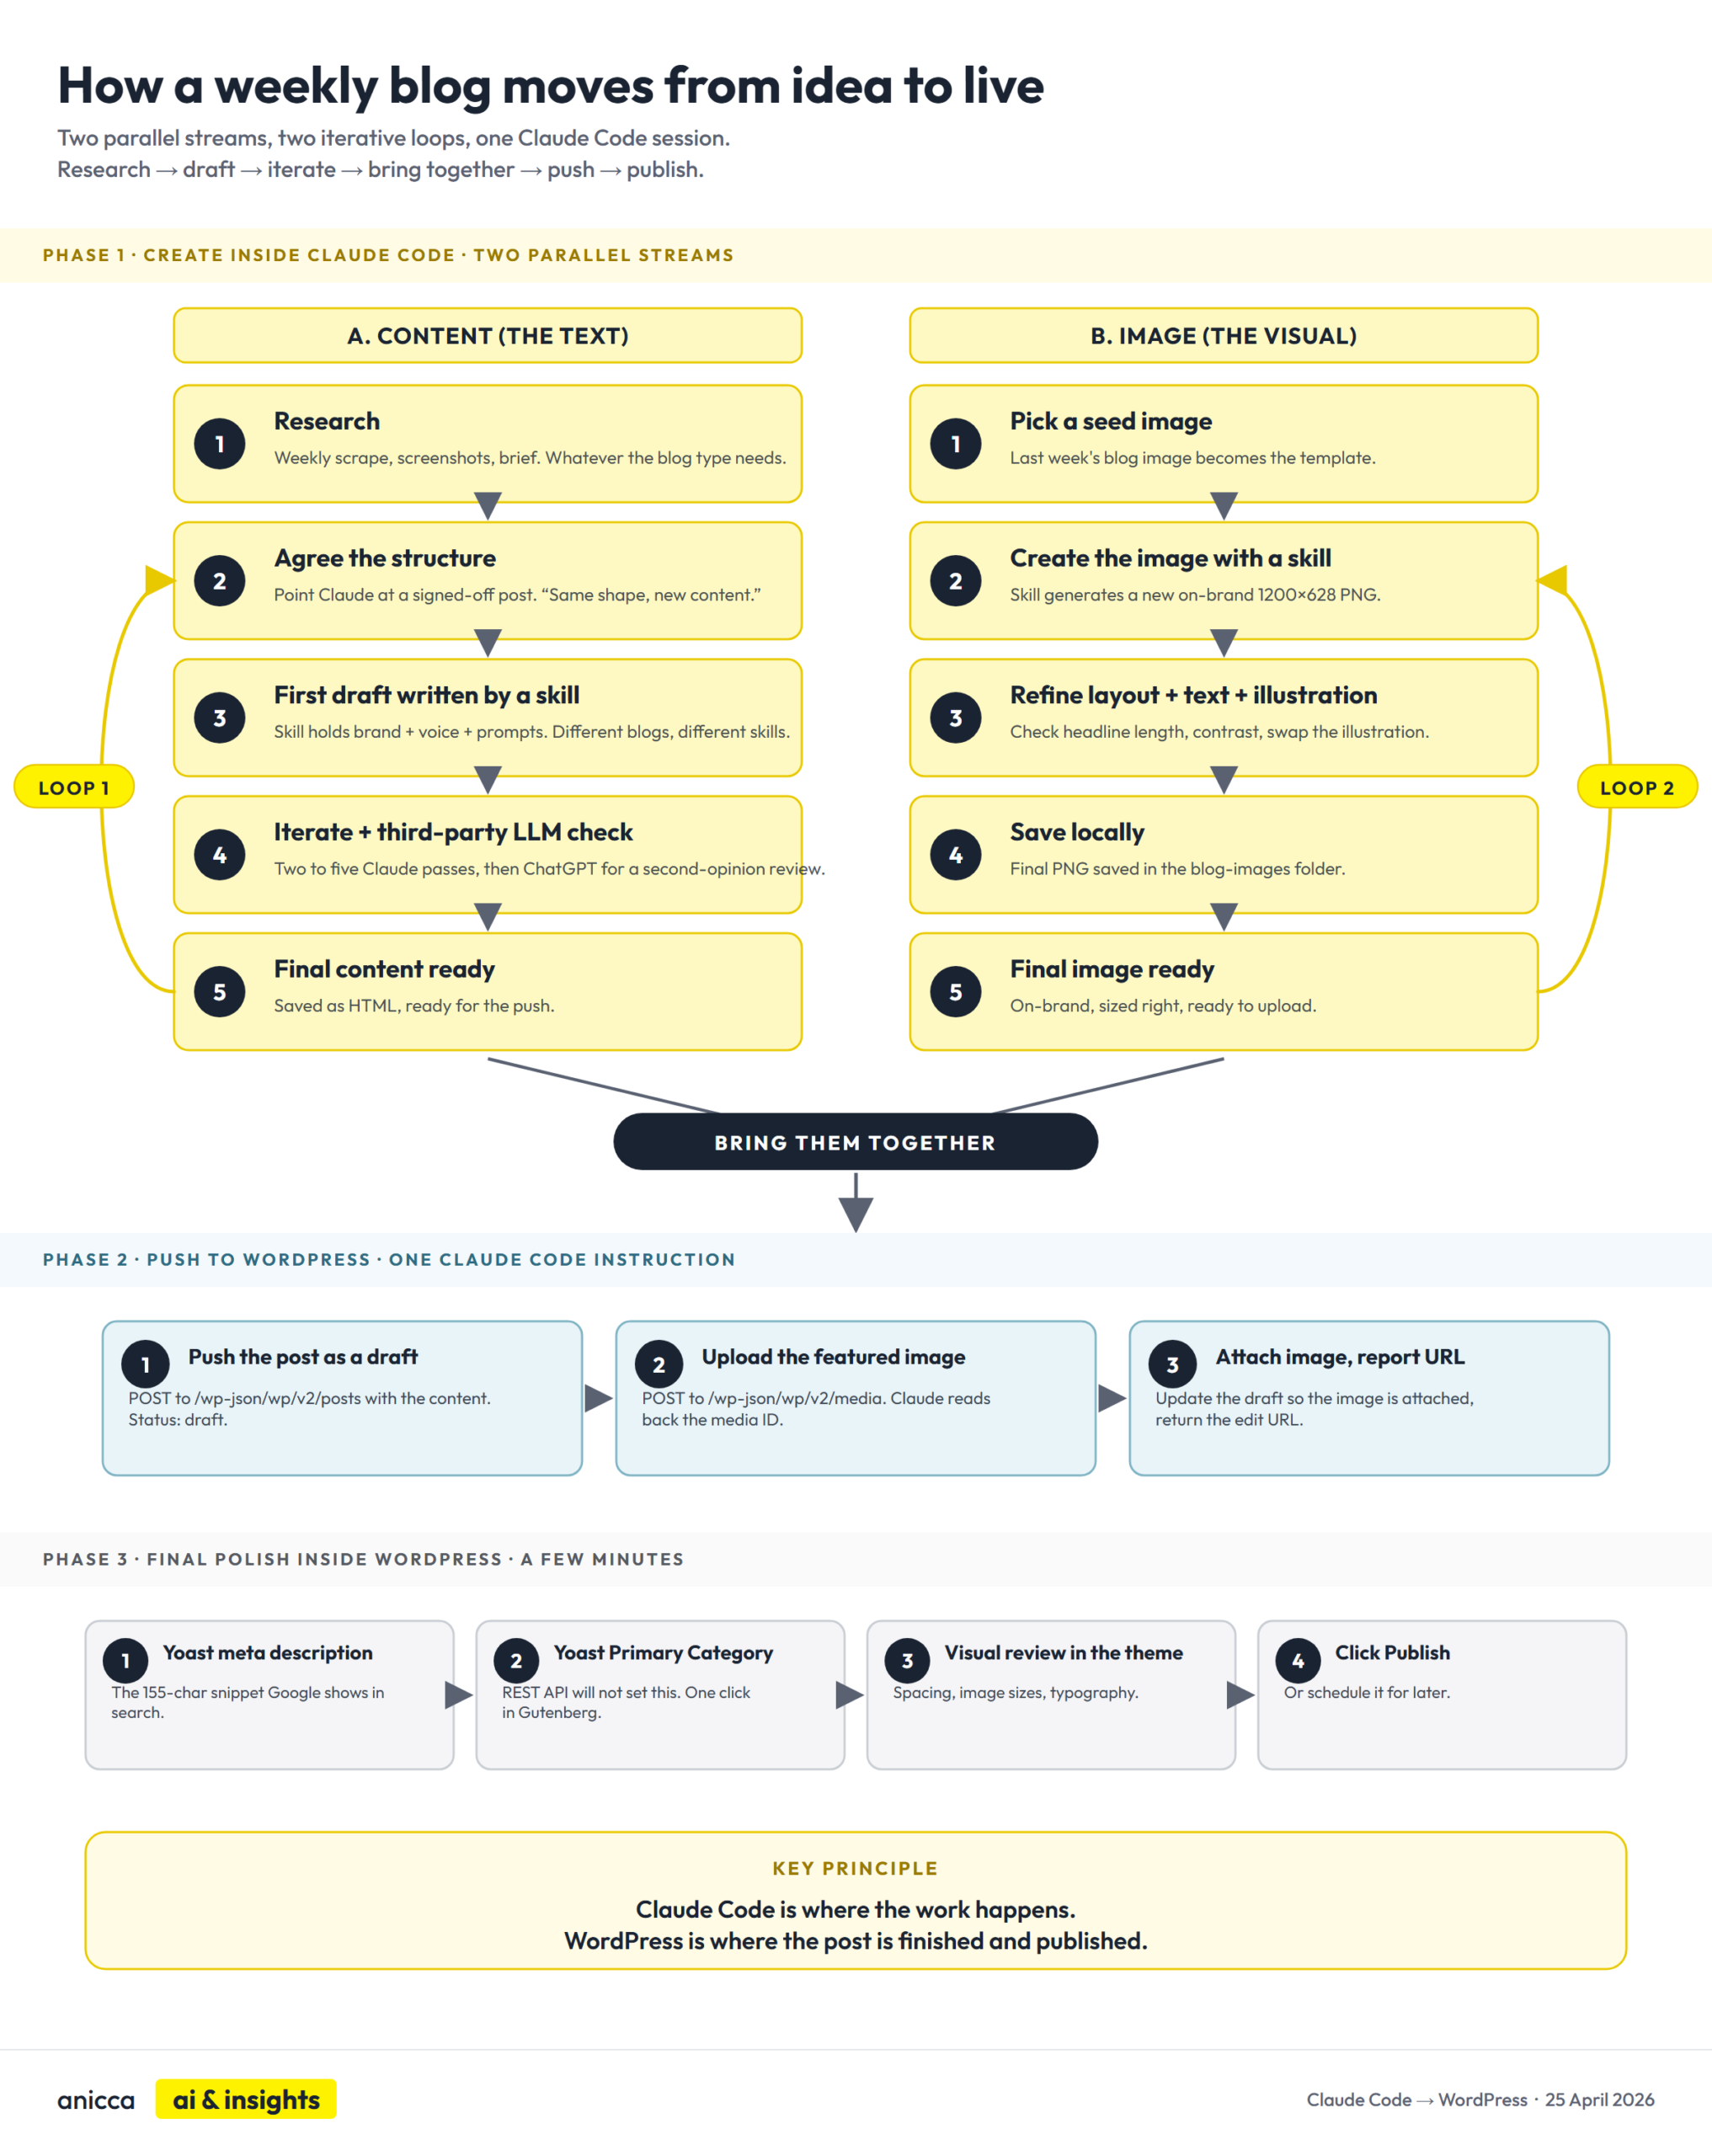
The table below shows each step, the phase it belongs to, what happens, and which skill (if any) does the work.
| Step | Phase | What happens | Skill (or technique) |
|---|---|---|---|
| 1. Research | Creative, in Claude Code | Weekly scrape for news blogs; screenshots for product walkthroughs; client brief and data for audits. | /news-scraper for the news blogs; manual collection for other blog types. |
| 2. Agree the content structure | Creative, in Claude Code | Point Claude at a previously signed-off post: “same structure, new content”. | No dedicated skill (conversational with Claude). |
| 3. First draft | Creative, in Claude Code | A content-writing skill produces the first draft. Brand guidelines, tone-of-voice rules and detailed prompts are baked in. Different blog types have different skills. | /ai-news-blog-writer, /weekly-blog, audit-specific skills. |
| 4. Iterate + third-party LLM check | Creative, in Claude Code (iterative loop) | Two to five Claude passes to tighten, then a third-party LLM check (usually ChatGPT) for a second-opinion review that catches what the original model stopped seeing. | Claude Code chat plus ChatGPT (paste-and-review). |
| 5. Seeded featured image | Creative, in Claude Code (iterative loop) | Image generated from last week’s image as a seed, with one or two tweak passes so it lands on-brand. | /blog-image |
| 6. Push the post as a draft | Push, in Claude Code (one instruction) | POST to /wp-json/wp/v2/posts with the content, headings, status: draft. Claude reports back the new post ID and the WordPress admin edit URL, ready for review in the theme. | /wp-content-publish (the skill this guide builds). |
| 7. Upload the featured image and attach it | Push, in Claude Code (one instruction) | POST the image to /wp-json/wp/v2/media to get a media ID, then update the draft post so the image is set as the featured image. | /wp-content-publish |
| 8. Final polish + Publish | Manual, inside WordPress admin | Yoast meta description, Yoast Primary Category, visual review in the theme, click Publish (or schedule). | No skill (Ann’s manual step in Gutenberg). |
From here, this guide focuses specifically on steps 6 and 7 (the push from Claude Code to WordPress) and step 8 (the final polish inside the admin).
Part 2 of this series covers the earlier creative stages and the LinkedIn promo stack in depth. This will be published next week.
3. What You Need to Set This Up in Claude Code and WordPress
You need four things to set this up; the list below explains what they are in plain English:
- A WordPress Application Password (so Claude Code can log in to WordPress in order to publish)
- A .env file (a plain text file that stores your keys safely)
- The WordPress REST API (already on your site, no setup needed)
- Claude Code itself (the session you are working in)
The one-off setup (items 1 and 2) takes about fifteen minutes. Once that is done, every future piece of content flows through the same workflow with no additional configuration.
3.1 A WordPress Application Password
A 24-character login code that Claude Code uses to authenticate to WordPress as you.
You generate it once inside WordPress. Think of it as a disposable backup password that sits alongside your normal login.
Claude never needs your real WordPress password. If the Application Password ever gets compromised, you revoke it and generate a new one.
Step-by-step walkthrough in Generating a WordPress Application Password below.
3.2 A .env file
An .env file is actually short for “environment”. That is the technical term for the set of variables and settings that software on your computer can read.
A .env file is a plain text file, saved on your computer, named literally .env (with the leading dot). It holds your confidential access codes or “keys” to any third-party platform that you might want to access.
In our case, this is WordPress. Depending on what else you use Claude Code for over time, you may collect other keys too (a Google Ads key to pull ad data, a GA4 key for analytics, an OpenAI or Netlify key if you use those services). They all live in the same .env file. The file lives on your computer only, and is deliberately kept out of anywhere public.
What is contained in the .env file?
A “key” (developers also call it an “API key”, “Token”, or “Secret”) is just a long, random string of characters that one piece of software uses to log in to another piece of software. Think of it as a password that computers use to talk to each other, instead of a human typing it into a website.
In addition, the file will also contain the details of the URL (or location) of where each platform can be accessed.
Details required for accessing WordPress
Your WordPress Application Password is one kind of key. Claude reads from the file automatically whenever it needs one.
The .env File section below walks through creating yours. It is the single most useful habit to build in your first week of Claude Code.
3.3 The WordPress REST API
A set of web addresses that WordPress already exposes, ready for external software (like Claude Code) to talk to it.
“REST” is the pattern. “API” stands for “Application Programming Interface”, which is the formal term for “the place where one piece of software talks to another”.
You can see yours right now. Open a browser and type yourdomain.co.uk/wp-json/. WordPress will respond with a list of everything it can do.
You do not need to understand how the REST API works. Claude Code handles that conversation on your behalf.
3.4 Claude Code itself
If you are new to Claude Code, our free Claude Code Implementation Guide covers the setup from scratch.
Within your Claude Code session you will describe what you want and you will invoke the Claude skills outlined in the table above.
I have provided an example below for initiating a blog on the use of Claude Code by marketers and managers. You can modify this to try it yourself and Claude will ask you follow-up or clarifying questions.
If you have not yet built any skills of your own, you will need to give Claude more detail at each step the first time you run the workflow.
I would suggest reading the free Claude Code Implementation Guide first, which walks through how to build skills and how to seed each stage, and joining the Thursday AI Club where members share the skills we have already developed.
4. Generating a WordPress Application Password
Application Passwords are a built-in WordPress feature that let a piece of external software log in as you, without using your actual login password. You generate one for a specific purpose (in my case, “Claude Code on my laptop”), and if it ever gets compromised you revoke it and generate a new one. Your real password is never touched.
- Your WordPress username (usually your admin email address, e.g.
[email protected]). - A 24-character Application Password (formatted like
abcd EFGH ijkl MNOP qrst UVWX).
Here is how you get the password.
- Log in to WordPress admin at
https://yourdomain.co.uk/wp-admin(swap in your own site URL), as yourself or as whichever user you want the content to be attributed to. - Go to Users -> Profile in the left-hand menu. This is also where you can see your WordPress username displayed at the top of the page, in case you need to double-check it before it goes into the
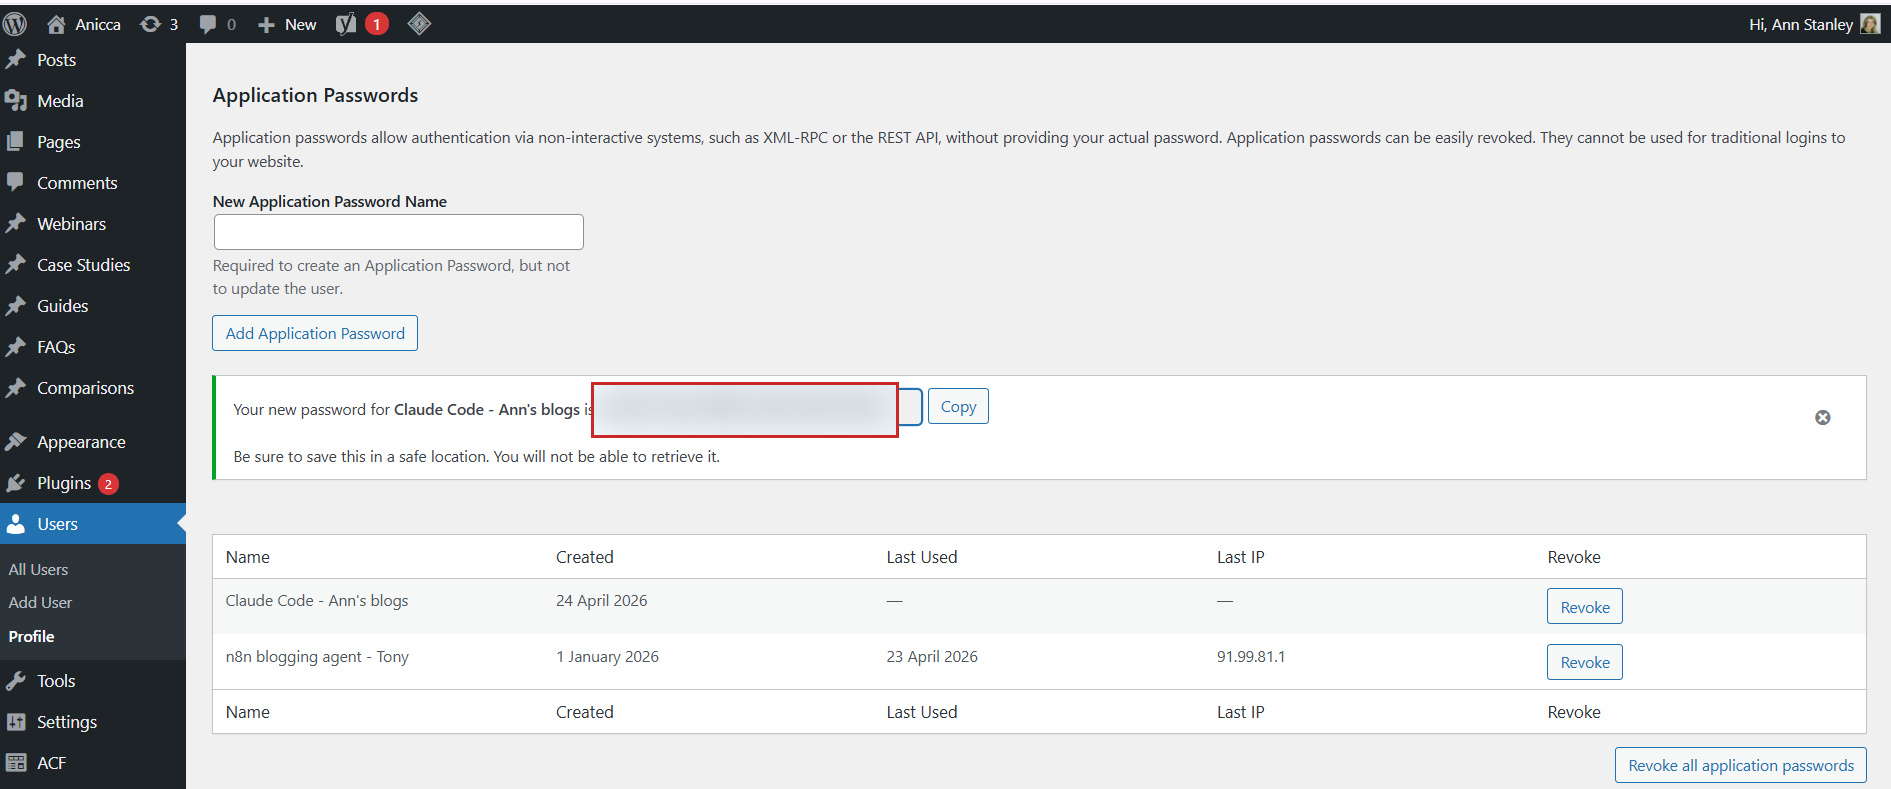
.envfile in the next section. - Scroll to the bottom. You will find a section called Application Passwords.
- In the “New Application Password Name” box, type something you will recognise later. I use
Claude Code on my laptop. If you generate more than one over time, the name is how you will tell them apart to revoke the right one. - Click Add New Application Password.
- WordPress shows you a 24-character string, formatted like
abcd EFGH ijkl MNOP qrst UVWX. Copy it now. You will not see it again.
If you cannot see Application Passwords at the bottom of your profile, it is usually one of two things.
Either your site is on an older version of WordPress (update first), or a security plugin or your hosting provider has disabled it (ask them to turn it back on, or use the official Application Passwords plugin to restore the feature).
5. The .env File: Where All Your Confidential API Access (keys) Live
For this WordPress workflow, your .env file only needs three keys: your site URL, your WordPress username, and the Application Password you just generated. That is everything.
In practice, the same .env file ends up holding every other key you collect over time. My own .env has around thirty keys in it. One set for WordPress, plus keys for Google Ads (to pull ad performance data), GA4 (analytics), Netlify (for deploying web pages), and several AI services my other Claude Code skills call behind the scenes.
Every Claude Code session on my machine reads from that same file.
Keeping every key in one place matters. If any key needs rotating (because the service expired it, or it has been accidentally leaked), I change it once in the .env file and every project I use it in keeps working. I never have to remember which folder has which credentials.
Create a file called .env in your projects folder. For the WordPress workflow described in this guide, you need three keys and three keys only. No other API credentials are required to push content from Claude Code to WordPress.
WP_URL=https://yourdomain.co.uk
[email protected]
WP_API_KEY=abcd EFGH ijkl MNOP qrst UVWX
The three keys:
WP_URL– the full address of your WordPress site, including thehttps://. This is the same URL you type into a browser to visit your site.WP_USERNAME– your normal WordPress login username (usually an email address). You can find this at the top-right of WordPress admin after you log in, or in Users -> Profile.WP_API_KEY– the 24-character Application Password you generated in the previous section, spaces and all (WordPress accepts both formats). This is not your real WordPress login password, never use that one.
One safety note: a .env file never goes into version control.
If you are using Git (a version control tool that tracks changes to files over time, used mostly by developers) with GitHub (the most popular online place to store Git-tracked files), add .env to your .gitignore file so it never gets uploaded to GitHub. If you do not recognise either term, you almost certainly are not using them, and you can skip this paragraph.
6. Pushing the post to WordPress as a draft
Once your .env is set up and your skills are in place, you can push your content into WordPress as a first draft.
6.1 The push
From a Claude Code session, ask Claude to use your /wp-content-publish skill on the finished content. The example below also includes the reference to Gutenberg blocks explained in the section below.
What this looks like in practice:
In practice, once the skill is set up, my own prompt is usually shorter: “push the Claude Code weekly blog to WordPress as a draft”. The skill carries the Gutenberg-blocks rule from previous runs, so I do not need to repeat it every time.
Behind the scenes, Claude Code sends a “POST request” to yourdomain.co.uk/wp-json/wp/v2/posts containing the title, slug, content, excerpt, status (usually “draft”), and any categories or tags, all wrapped in JSON (a standard text format for data, which Claude writes for you). WordPress reads the request, creates the post, and sends back the new post’s ID and the WordPress admin edit URL.
Thirty seconds later the post is sitting in my WordPress dashboard, ready for review.
6.2 Why you need to ask for separate Gutenberg blocks, not one big HTML block
The content goes into WordPress’s block-based editor, which is called Gutenberg.
Gutenberg is the editor you have been using every time you have written a post in WordPress since 2018, even if you did not know the name for it. Each paragraph, heading, image or list is stored internally as a “block”. Themes like Kadence, Astra, GeneratePress, Twenty Twenty-Four and most other modern WordPress themes all use Gutenberg under the hood, and any extra block plugins (Kadence Blocks, Stackable, GenerateBlocks) just add more block types on top.
Claude Code handles the block formatting (syntax), so you never have to learn it. But there is one important detail to know about.
By default, Claude Code will often push your whole post as a single Custom HTML block: one block containing all the raw HTML for your post. That works. But if you later want to edit a paragraph inside WordPress, you will be staring at HTML code instead of the friendly paragraph and heading blocks you are used to.
What you actually want is for the post to arrive as separate Gutenberg blocks per paragraph, heading, image and list, so every element is editable directly inside WordPress without you reading any code.
You have to ask for this explicitly. I add “push it as individual Gutenberg blocks, not one Custom HTML block” to my instruction every time.
What this looks like in the editor (a mix, not all one or the other)
In practice you will see a mix of block types when you open the draft in WordPress, not a uniform set of blocks. Paragraph, heading and list blocks arrive as standard Gutenberg blocks that you click into and edit normally. Anything with custom styling (the TL;DR box, the Table of Contents, the table in section 2, the callouts, the image placeholders, and the Thursday AI Club CTA at the bottom) will arrive as Custom HTML blocks so their styling is preserved.
That mix is what you want. The body prose, where most of your editing happens, sits in proper paragraph and heading blocks. The styled visuals stay intact as Custom HTML so they keep looking right on the front end. If you do need to edit the content inside a Custom HTML block, use the block’s “Edit as HTML” toggle or its “Convert to blocks” option to break it into editable pieces.
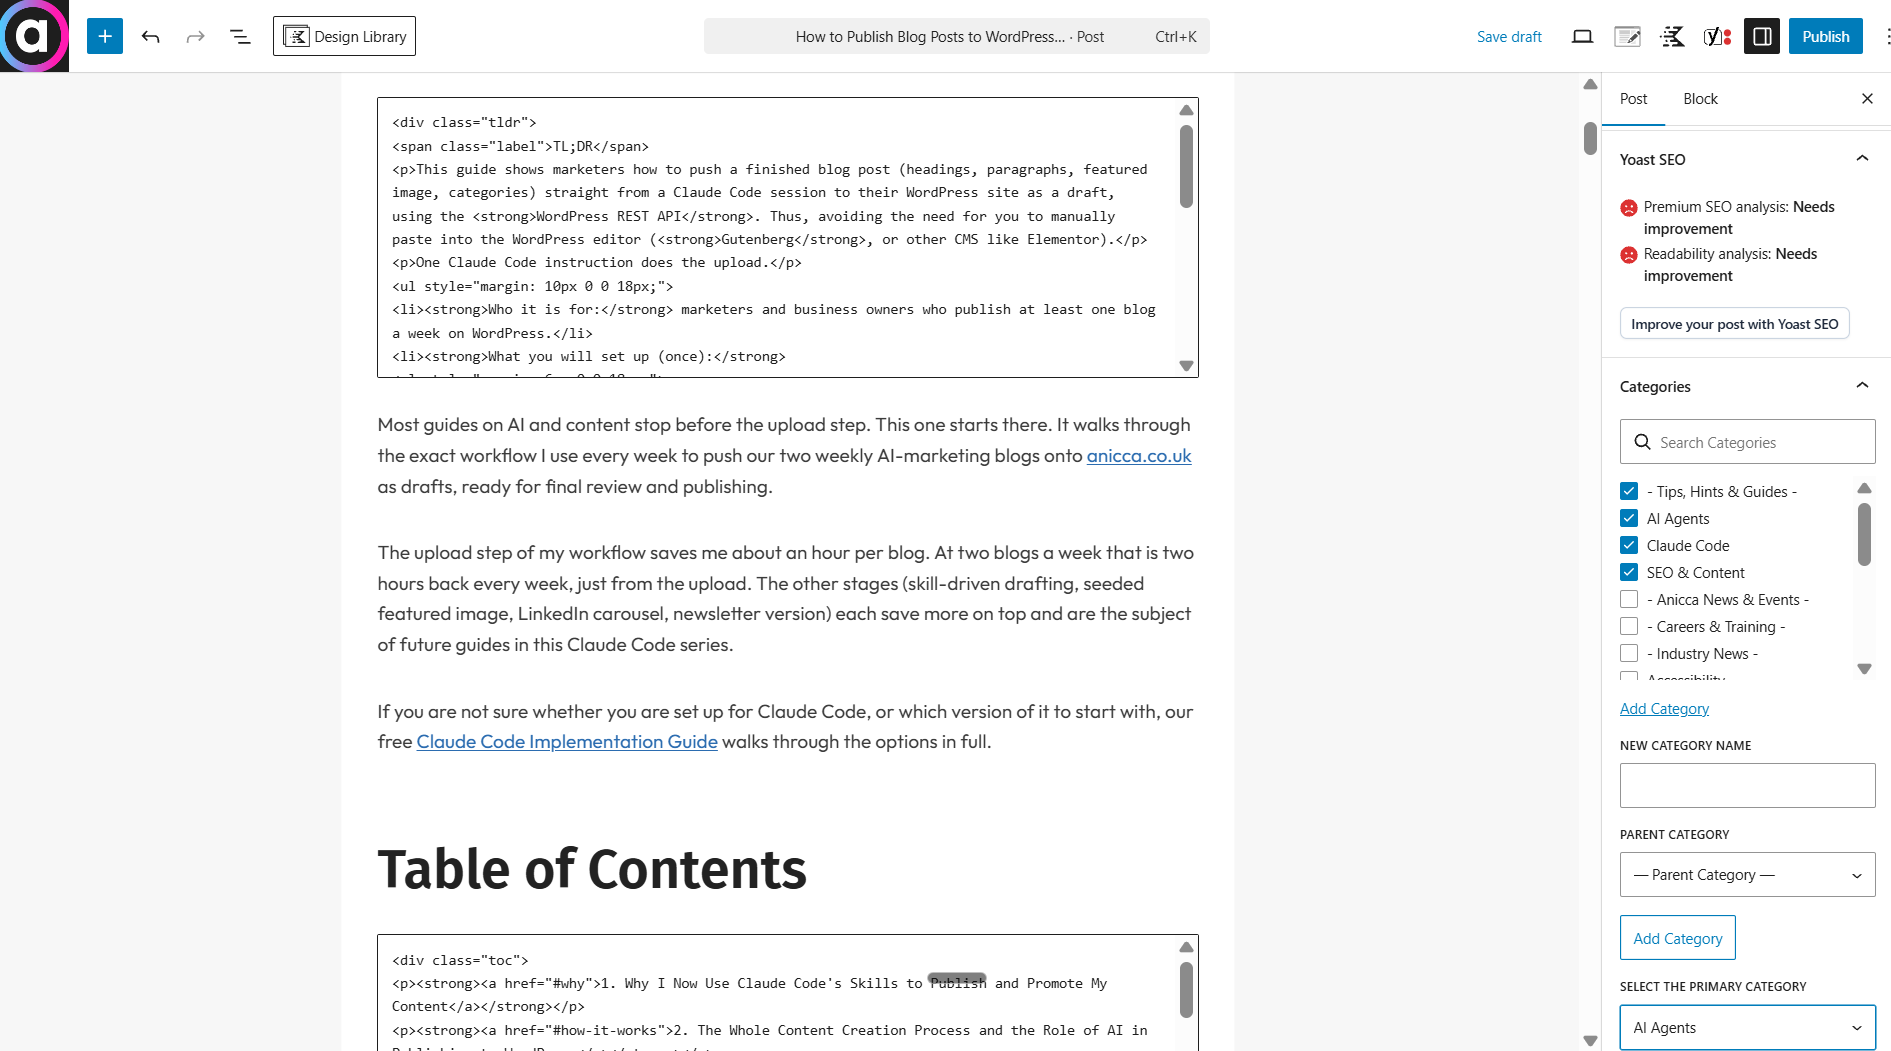
You will also notice on the right of the same screenshot that four categories are ticked in the sidebar: Tips, Hints & Guides, AI Agents, Claude Code, and SEO & Content. The REST API push does not apply categories automatically, so I ticked those manually after the draft landed. Categories are one of the small manual WordPress steps covered in section 9, alongside the Yoast meta description and the Yoast Primary Category.
If you forget the “individual blocks” instruction altogether and the whole post arrives as a single Custom HTML block, WordPress has a “Convert to blocks” option inside the post editor that splits it into its individual pieces after the fact. But getting it right the first time is cleaner.
6.3 Review the draft in the theme, iterate, then move on
I always push as a draft, never straight to live. Once the post lands, I open it in WordPress and switch to the theme preview to check the structure reads cleanly: headings in the right order, paragraphs spaced as expected, lists rendering, and any inline-image placeholders looking right.
Anything broken at this stage goes back into the Claude Code session, where I fix it in a few words and push again. The draft updates in place, with no copy-paste anywhere.
Once the content reads right in the theme, I move on to the featured image and then the final polish steps in WordPress.
7. Creating and publishing the featured image
At Anicca Digital I use a reusable skill that generates the featured image too. It builds a branded 1200 by 628 PNG in our brand colours, seeded from a previous week’s image so it lands on-brand without starting from a blank canvas, with the headline on the left and a relevant illustration on the right.
So when I say “produce the blog image”, Claude generates the image, uploads it, gets the media ID and attaches it to the post all in one instruction. Every stage of the workflow lives inside the same Claude Code session.
Get the content where you want it before you turn to the featured image. Once both the content and the image are signed off, push them to WordPress using the recipe above.
What Claude Code actually does:
- Takes the image file (PNG, JPG, WebP, anything WordPress accepts).
- Sends it to
yourdomain.co.uk/wp-json/wp/v2/mediaas a POST request. - Reads the response, which contains a media ID (a number like
55686) and the URL where the image is now stored. - Keeps the media ID in memory for the next step, where it gets passed to the post as
featured_media.

8. Pushing a Page into WordPress (Same Recipe, Different URL)
A page in WordPress is structurally almost the same as a post. No date, no author byline on the archive, no appearance in “recent posts” widgets. Pages are for About, Services, Contact, the resources hub. I use pages for the Claude Code guide landing page and the Resources and Downloads hub.
The API call is identical except for one word in the URL:
- Posts go to
yourdomain.co.uk/wp-json/wp/v2/posts - Pages go to
yourdomain.co.uk/wp-json/wp/v2/pages
Same authentication. Same payload. Same response. Same draft-first workflow.
9. What You Still Have to Edit Directly in WordPress
The workflow gets a draft post into WordPress with its content, headings and featured image all in place. Around 80% of the work. The last 20% still has to be done directly inside WordPress:
- The categories. The REST API push does not apply categories automatically, so you tick the ones you want in the Categories panel on the right of the editor (for example, on this post: Tips, Hints & Guides; AI Agents; Claude Code; SEO & Content). One quick step.
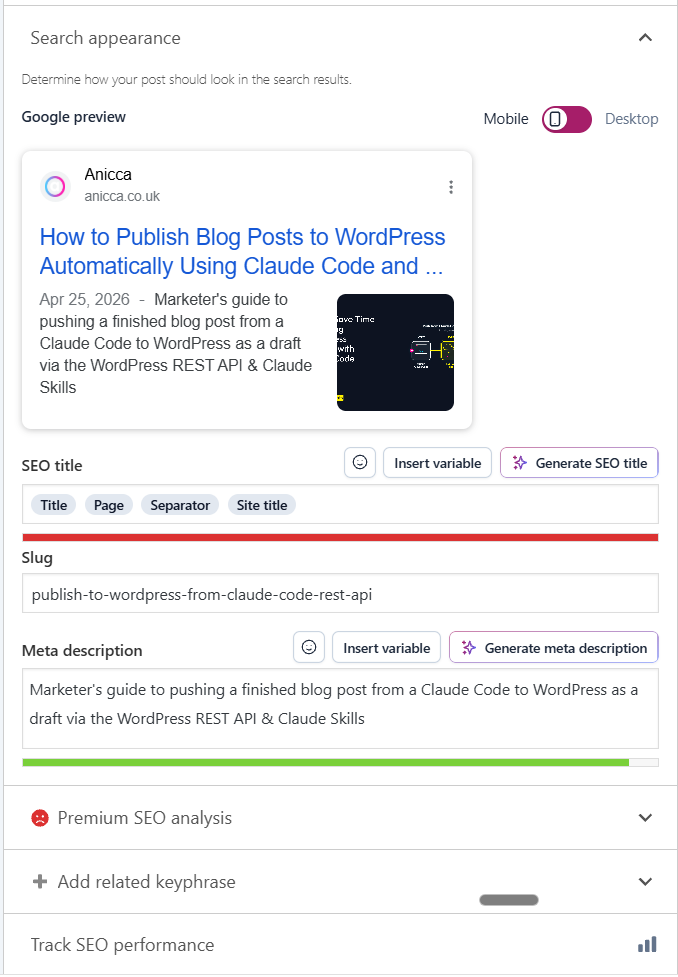
- The Yoast meta description. The 155-character snippet Google shows in search results. Better written once the draft is in the theme, so you can see how it reads alongside the headline and the URL slug. Two minutes per post.
- The Yoast Primary Category. If a post belongs to more than one category, Yoast uses the primary category to decide which posts appear in your theme’s “similar posts” widget. The REST API will not set this, so it is a manual click inside WordPress after the categories are ticked. Thirty seconds, but easy to forget.
- The final visual review. Regardless of how carefully you have iterated on the content, the last pass has to be done inside the theme. That is the only context that tells you whether the spacing is right, whether images render at the size you expected, and whether the theme’s typography is doing the post justice.
- Scheduling and publishing. The WordPress calendar is already the source of truth for your publishing schedule. Better kept there, so everybody on the team sees the same view.
Four of those five items are small jobs. The categories are a few clicks. The meta description is a minute of typing. The primary category is one click. The visual review is a scan, not a rewrite. The final click is Publish.
By the time the draft lands in WordPress, the content is ready to go live. WordPress is not doing the creative work. It is holding the finished content, collecting a couple of SEO settings the REST API does not expose, and publishing it.
10. When the WordPress Push Goes Wrong (the Four Common Errors)
Four errors you will see if something in the setup is off. Each one is a three-minute fix.
10.1 Error 401 Unauthorized
The Application Password is wrong, has been revoked, or the .env is pointing at the wrong value. Generate a new Application Password, update the .env file, try again.
10.2 Error 403 Forbidden
Your user account does not have permission to publish. Check the role in Users -> All Users. Editor or Administrator is fine. Author can publish their own posts. Contributor can draft but not publish. Subscriber cannot do anything.
10.3 Error 400 Bad Request
Something in the data Claude sent to WordPress is wrong. Claude Code usually shows you exactly which field has the problem: “invalid slug format”, “unknown category ID”, “post title is required”. Fix the field and try again.
10.4 Error 500 Internal Server Error
A plugin is interfering with the REST API. Usually an aggressive security plugin blocking REST endpoints by default (Wordfence does this out of the box), an over-enthusiastic caching plugin, or an older SEO plugin. Disable plugins one at a time until the call succeeds.
11. When is it worth setting up this content engine?
If you publish one blog a month and a handful of pages a year, the time you would spend setting it up is probably more than it would save you. Stick with WordPress’s built-in editor.
However, if you are publishing more than once a week, it is probably worth the effort to set this up, particularly if you can get the skills from another directory or if you build your own while setting up your next blog.
What I have produced in three months with this content engine
In the last three months I have published 22 blog posts of my own through this content engine:
- 14 weekly “AI in Marketing and Management” round-ups
- 4 Claude Code posts, including From Claude Projects to Claude Code: A Beginner’s Guide and 5 Claude Code Skills Every Business Should Build First, alongside coverage of Anthropic’s product launches
- 2 long-form practical guides: The Marketers & Managers Guide to Building AI Agents with n8n and The Marketer’s Guide to OpenClaw
- 1 industry-analysis piece: The State of Search in 2025: Key Takeaways from the Datos & SparkToro Q4 Report
- 1 write-up of my appearance on Fred Vallaeys’ PPC Town Hall podcast
In the majority of cases each post is also accompanied by:
- A short-form LinkedIn post and a LinkedIn carousel (the carousel image is sometimes the same as the blog’s featured image, sometimes a separate one)
- A LinkedIn newsletter version, which we have recently started producing and which often quotes several of the week’s articles
- The WordPress push itself, and the wider promotional schedule that follows afterwards
Alongside my own output, James Allen runs the parallel weekly Search Marketing series (15 published in the same window) using the same content-engine principle, but on the n8n platform rather than Claude Code. He is currently migrating that workflow over to Claude Code.
None of this is magic.
It is that keeping all the work in one place, instead of jumping between two or three tools, adds up across every blog. The bottleneck in my content work is no longer producing the blogs. It is reviewing them, which is where the bottleneck should be.
12. Key Takeaways
- If you produce content regularly, the biggest time cost usually is not the writing or the publishing. It is the context-switching between the different tools you draft in and the environment you publish in.
- Moving the iteration into Claude Code means you stay in one place while you are doing the creative work, and only open WordPress once the content is close to final.
- The one-off setup is a WordPress Application Password plus a central .env file that stores it alongside your other keys. Fifteen minutes.
- Every future post follows the same three steps: upload the featured image, get the media ID, push the post with the media ID attached.
- Posts go to
/wp/v2/posts, pages go to/wp/v2/pages. One word different. - The final polish stays in WordPress on purpose. Meta description, Yoast Primary Category, visual review inside the theme, and the Publish button are all better done there.
- This workflow is worth setting up if you produce content at volume. If you publish one blog a month, it is not.
13. What Is Coming Next Week
This is Part 1 of a two-part series. Part 1 covers posts and pages that use your existing theme.
Part 2 covers landing pages and fully custom designs. Any time you want to break out of your theme and take over the canvas: a sales page, a thank-you page, a bespoke audit microsite, or a fully standalone site on Netlify.
Netlify is a web hosting platform, an alternative to traditional WordPress hosting, that lets you deploy a website from a folder of files. It is often used for one-off landing pages and reports that do not need a full content management system behind them.
Different workflow, same underlying plumbing. The credentials you have just set up all carry over.
Part 2 also covers the technique I use to keep quality consistent at volume: seeding Claude Code with your previous examples.
The reason every Anicca CRO report, competitor intelligence report and GEO audit looks consistent is not a 50-page brand guide. It is that I point Claude at the last one I signed off and say “this one, but for the new client”.
Once that pattern is working, scaling your best work across every deliverable becomes genuinely straightforward. That is where this becomes a full content engine rather than just a publishing shortcut.
If you want to go deeper in the meantime, our free Claude Code Implementation Guide walks through the full Claude Code setup, how to build your first skill, and how to roll it out to a team.
14. Glossary of Technical Terms
A quick reference for any of the terminology in this guide that was new to you.
- API key (also called a “key”, a “secret”, or a “token”)
- A long, random string of characters that one piece of software uses to log in to another piece of software. Different platforms use different names for the same thing: WordPress calls it an Application Password, Google and Netlify usually call it an API key, OpenAI and Anthropic call it a secret or token. They all do the same job. Think of it as a password that computers use to talk to each other, instead of a human typing it into a website. Your WordPress Application Password is one kind of key. Claude Code, depending on what you ask it to do, may need others (a Google Ads key, an OpenAI secret, a Netlify token). All of them live in your
.envfile. - Application Password
- A 24-character disposable login code you generate inside WordPress, to give external software (like Claude Code) permission to publish as you without using your real password. This is a specific kind of API key.
- Claude Code
- Anthropic’s desktop / terminal tool that can read files on your computer, run scripts, and call external APIs. The tool that makes this whole workflow possible. Not to be confused with Claude Projects (which runs in a web browser and cannot access your files).
- .env file
- A plain text file saved on your computer, named literally
.env, where you keep your login keys and settings. Short for “environment file”. Read automatically by tools like Claude Code. Never uploaded anywhere public. - Endpoint
- A specific web address inside an API that does one job. For example,
/wp/v2/postsis the endpoint for posts,/wp/v2/pagesfor pages,/wp/v2/mediafor uploaded files. - Git and GitHub
- Git is a version control tool that tracks changes to files over time, used mostly by developers. GitHub is the most popular online place to store Git-tracked files. If you use either, keep your
.envfile out of them with a.gitignorerule. - Gutenberg
- The WordPress block-based editor, introduced in 2018, and the default editor across modern WordPress themes (Kadence, Astra, Twenty Twenty-Four, GeneratePress, etc.). Everything you do in modern WordPress (paragraphs, headings, images, quotes, lists) is stored as a “Gutenberg block”, even if you have never heard the name. Page builders like Elementor, Divi, Beaver Builder, Bricks and Oxygen replace Gutenberg with their own canvas, and the workflow in this guide does not translate cleanly to those.
- JSON
- A standard text format for sending structured data between pieces of software. Looks like a list of labelled values inside curly braces. Claude Code reads and writes JSON for you.
- Netlify
- A web hosting platform, an alternative to traditional WordPress hosting, that lets you deploy a website from a folder of files. Used for landing pages, one-off client review sites, and password-gated reports. Covered in Part 2.
- REST API
- A standard way for software to talk to a website. “REST” is the pattern, “API” stands for “Application Programming Interface”. WordPress has one built in, and that is how Claude Code pushes content to it.
- Seeding (seeded example, seeded image)
- Pointing Claude at a previous piece of work and asking it to produce the new one in the same structure, style or format. The single most important technique for keeping quality consistent at volume. Covered in detail in Part 2.
- Skill (Claude Code skill)
- A reusable instruction set that tells Claude Code how to perform a specific task. Lives in a folder on your computer. To use a skill, ask Claude in plain English (“use my weekly-blog skill to write this week’s post”), or type
/followed by the skill name as a shortcut. Build once, use every time. - Slug
- The final part of a URL that identifies a specific page. The slug of
https://anicca.co.uk/blog/claude-desktop-redesignisclaude-desktop-redesign. - Yoast SEO
- A popular WordPress plugin for managing SEO settings, including meta descriptions and primary categories. Used by most WordPress sites.
I use this workflow to produce content at Anicca Digital every week and have done for three months. If you try it and hit a snag, please let us know and I will add the fix to the troubleshooting section.

Thursday AI Club
A hands-on AI club for marketers and managers. Fortnightly 3-hour sessions: Hour 1 is an open Q&A on any AI question; Hours 2-3 split into a workshop track (for newbies) and an advanced track (live demos and deeper questions).
Led by Ann Stanley, James Allen.
Membership: £40/month or £400/year
Join the Thursday AI Club →