How to Track Website Calls In Google Ads


Multiple ways to quantify your advertising spend in Google Ads with conversion tracking actions exist. Google phone call lead tracking is one of the key ways to measure your ads’ performance by tracking phone calls.
Google website phone tracking uses Google forwarding numbers to measure the performance of your call extension. When someone visits your website after clicking on one of your ads, website call conversion tracking can help you identify and measure calls from your site. It generates a dynamic number that will show to each Google ads visitor on your website. This way, you’ll be able to track the volume and the details of your calls and count them as conversions within your campaigns. What’s more, you can also choose to set a minimum call length for what you want to count as a conversion.
One drawback of Google’s website phone tracking is that the only way to verify a call as a conversion is to set a minimum call duration, for example – only count calls 60 seconds or over. While this may be a small call quality indicator, it does not necessarily mean that the call resulted in a sales lead.
You can get this through third-party tracking solutions such as Response Tap and Infinity for more comprehensive call tracking that can report phone leads beyond just Google ads. With a third-party option, you can set up a post-call IVR (Interactive Voice Response) to allow leads and sales to be specified by call staff. For example, call staff can press 1 for lead, 2 for enquiry, 3 for sale etc. This data can then be passed to Google Analytics and other platforms.
There are 3 types of call tracking you can set up:
- Calls from ads
- Calls to a number on your website
- Clicks on a number on the mobile site.
The following steps will cover the ‘calls to a number on your website’ as this is the most complex to set up, and once you grasp this, the others will be a walk in the park!
Before you start, make sure you have access to the following:
- A working website with the Gtag Pixel or Google Tag Manager pixel installed across all pages.
- Access to your Google Tag Manager account
- Call extensions are enabled within your Google Ads account.
- Be a business in an eligible country; see the list here
Step 1. Create the conversion action in Google Ads
Tools & Settings > Conversions
Click ‘+ New conversion action’ to create a new conversion.
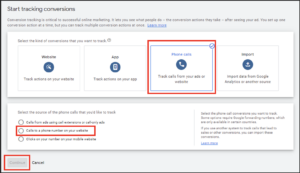
Phone Calls > Calls to a phone number on your website > Continue
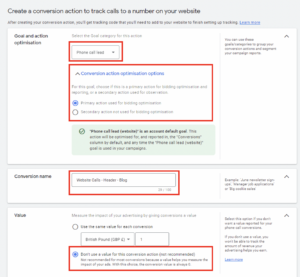
Fill out the conversion action settings; give your conversion a name, set it to a ‘Lead’ as you won’t be sure if it’s a conversion or not, ‘Don’t use a value’
Pay careful attention to the conversion action optimisation options, if you want to report phone calls as a main conversion action, set it as primary. If it’s secondary to your leading indicators of success e.g. a quote request, then set the phone call lead as a secondary action.
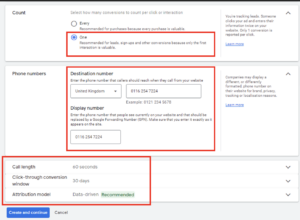
Only count it once ‘One’ (not each time the customer rings). The default settings for the next 2 options should be fine ’60 seconds’ call length and ’30 days’ conversion window. The next part is up to you which attribution model to use, by default Google will select data-driven, which I would recommend using.
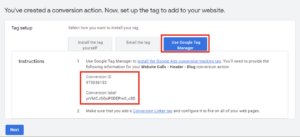
On the next screen, you’ll want to select the ‘Use Google Tag Manager’ option and keep your ‘Conversion ID’ and ‘Conversion label’ somewhere safe, you’ll need them later. You can just leave this window open to copy and paste from.
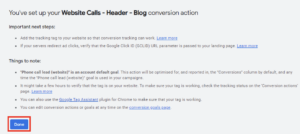
Anyway, the next screen is just the ‘Done’ screen – you don’t need to complete this step until the rest of the guide is complete.
Step 2. Create the tag in Google Tag Manager
Tags > New
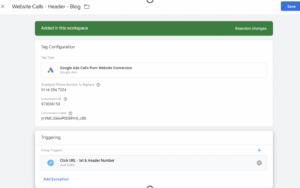
Call your tag something like “Calls from Website” and select the ‘Google Ads Calls from Website Conversion’ from the tag type. The next 3 fields you should be able to populate with the number from your website, and your conversion ID and label from the previous step.
It’s always good practice to use the same naming convention for both Google Ads and Tag Manager to make it easy to troubleshoot if conversion tracking stops working in the future.
Step 3. Setting up a trigger
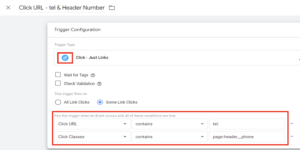
Now depending on your current setup you may need to set up a new trigger, which tells Google when it should determine the action to be a website call.
The example below is tracking people who call using the phone number at the top of the site (the header). However, you will probably just want to be tracking anyone who calls via a number on your website.
In order to set up the trigger you first need to decide what variable(s) you are going to use and find these by using the preview mode and carrying out the action you wish to track.

Enter your url and click connect, this should open a separate browser.
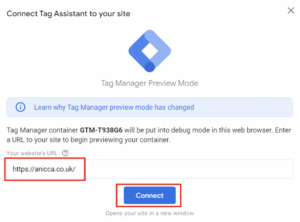
You should see a small box in the corner saying the tag assistant is connected. If you don’t then it’s more than likely you’re not on the right tab. In order to get the variable data we first need to click on the number at the top of the screen once and not click anywhere else.

Once you’ve clicked go back into your other browser and determine which click was you clicking the phone number. It should be one of the last clicks. In this example, we are using click URL and click classes for the trigger. I would recommend using only click URL to avoid confusion.
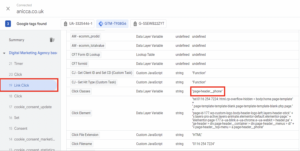
Copy the click URL, you will need this for later. Create a new trigger and select just Link clicks are your trigger type. Select the trigger to fire on some link clicks and add part of the Click URL data in. In the below example, the trigger will fire if the click URL contains tel: and the click class contains page-header__phone.
Step 4. Testing
Make sure your changes are saved and preview the website again, this time when you click the phone number, you are going to look in the tab section and see whether your tag fired correctly.
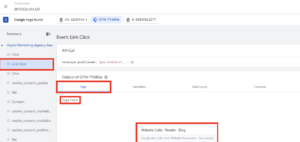
If it all appears correct the last thing to do is click submit and get tracking those phone leads. It wasn’t that hard, was it?

Or maybe it was? In this case, call us on 0116 254 7224 and we can assist you with all your tracking needs. We will definitely be tracking your phone number click!


