Time Saving Ad Hacks for Meta and LinkedIn

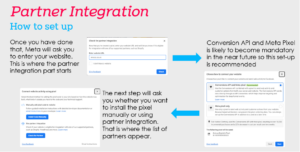
Meta Pixel: Partner Integration
A pixel or a tag is the connector between your website and your social media platforms.
Without a pixel or tag installed properly, you are most likely wasting money on your ads and you’re unlikely to see any relevant results.
You can install your pixels in a number of ways; some require developer input that can make the process time-consuming and take the control of the task out of your hands. Others, however, are simplified ways that have been created to make the process easier and quicker.
Connecting your website to your social media pixel is essential for tracking and optimizing performance, however, a common error that is made by (too) many professionals is that they opt for a manual method when it comes to the integration.
Instead of necessitating advanced analytics or developer help, the pixel can be set up using partner integration which makes the process extremely simple.
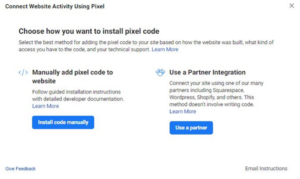
What is partner integration?
A partner integration refers to setting up your pixel using one of the many available partners that Meta has teamed up with.
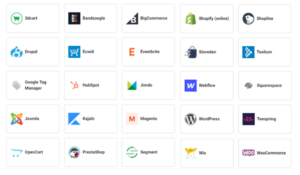
Some of the more common partners are:
- Google Tag Manager
- Shopify
- WooCommerce
- HubSpot
- WooCommerce
- Magneto
- Eventbrite
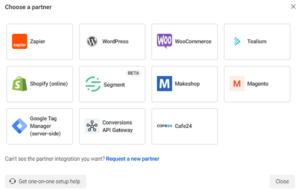
API Integration
Meta are also encouraging people to set up Meta API integration.
This is a more complex set-up that requires some technical expertise.
The list of partners for this is limited to those shown below.
How to set it up
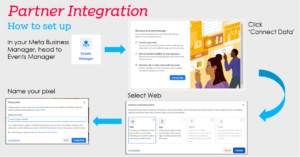
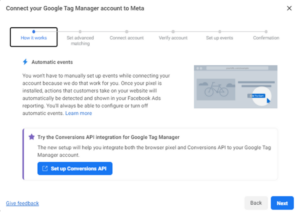
Once you’ve selected the partner of your choice, a number of steps for completion will appear.
For Google Tag Manager (GTM), for example, you will need to log into your GTM account through a pop-up and select the tag manager through which you wish to connect.
The whole process can take just a few minutes provided your GTM is set up properly.
Once set up, give the pixel a while to process.

Benefits of Partner Integration
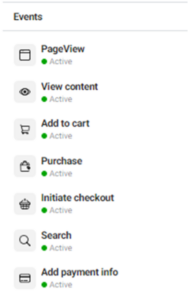
Beyond the obvious time-saving aspect of the pixel set-up, partner integration also helps with your conversion set-up.
As long as everything is set up correctly on the other end (i.e. on your website, Shopify, etc) Meta will pull conversion events through the integration.
This means that you won’t have to manually set up events such as:
- AddToCart
- Purchase
- Lead
You will also pull through important information like Purchase Value in ads manager.
Duplicating and Copying
Duplications are a great way of saving yourself from doubling up on work.
Setting up new campaigns, ad sets and ads can take a significant amount of time, so in an ideal world, you don’t want to do it all over again every single time you set up something new.
In this section we look at using copy/paste and duplications to build new:
- Campaigns/Campaign groups
- Ad sets/Campaigns
- Ads
The most common use of duplications is for ads.
Example: You build an ad from scratch that you’re using for prospecting. It could be a carousel ad that has taken a significant amount of time to upload and double-check, and you’ve finally launched it to your attribution/interest target audience.
But now you want to add it to your lookalike ad set/campaign.
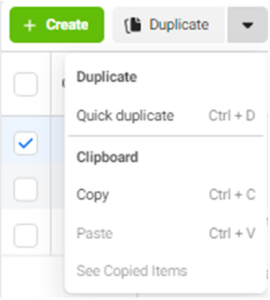
Instead of starting all over again, you can copy the full ad and paste it into the ad set.
This can also be done to multiple ads and ad sets at the same time.
How to: Meta
Step 1
Tick the ad(s) you want to duplicate and click the ‘Duplicate’ drop-down.
Select ‘Copy’ from the list.
If you want to duplicate the ad into the same ad set click duplicate.
Also found underneath the ad if you hover above it.

Step 2
Tick the ad set(s) you want to add the ad(s) to and click the drop-down again.
You will see the ‘Paste’ option appear

How to: LinkedIn
On LinkedIn it works slightly differently. If you want to use an ad from another campaign you select ‘Browse Existing Content’ when creating ads.
![]()
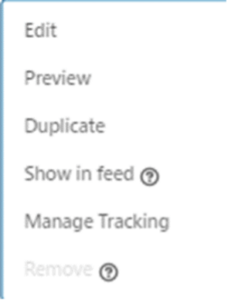
If you want to duplicate an ad, click the three-dot drop-down and select ‘Duplicate’.
You can then make any necessary edits and the same can be done if you select existing content and want to make edits to the ad in the new campaign.
Once the ads have been pasted/duplicated/added from existing content, you can make edits to the parts you want to change instead of starting from scratch.
Therefore, you may want to change the tracking parameters (see below) or alter the captions slightly.
In some instances, you may be testing the creative, in which case you simply change the creative and leave the rest.
When duplicating ads it is even more important to quality check your ads because any error will be carried through to the other ad sets.
Ad Set/Campaign Duplication
There are a few different scenarios where you may want to duplicate or copy over ad sets. Some are:
- You want to run the same ads but change the targeting
e.g. Same ads but different targeting
- You want to use the same targeting for a different campaign
e.g. You want to run a traffic campaign as well as a conversion campaign
- You want to test different objectives
e.g. See how optimising for AddToCart compares to Landing Page views
How to: Meta
On Meta, ad set copy and pasting, as well as duplication works the same as on ad level. As does campaign manager.
From there you can make all the necessary changes. Common ones include:
- Changing the audience
- Changing placements
e.g. original ad set was for Facebook only, but the new one is for Instagram only.
- Changing attribution window
e.g. from 7-day click + 1-day view to 7-day click only
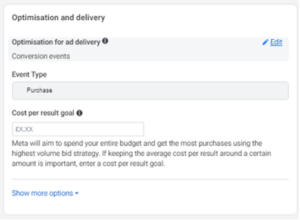
- Changing optimisation for ad delivery or event type
e.g. from purchase to AddToCart
How to: LinkedIn
On LinkedIn, campaign duplication works slightly differently from ad duplication.
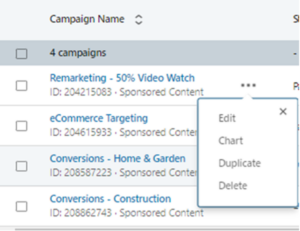
You can duplicate the campaigns from the main Campaign Manager view by selecting the three dots next to the campaign you wish to duplicate.
Once duplicated you can make any relevant changes to targeting, ad format etc. and have the option to select the ads you want to include.
LinkedIn does not allow multiple ad formats in one campaign e.g. single image, video, carousel.
This makes the duplication feature more relevant.
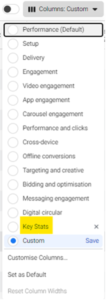
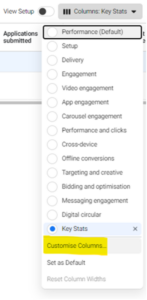
Customising Views and Presets
What is a preset?
When talking about views, custom columns and presets, we’re referring to the view you use to analyse campaigns, ad sets and ads in ads managers.
How to
In Ads Manager:
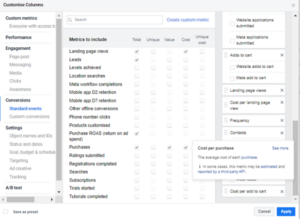
Click ‘Columns’ and select customise columns from the drop-down.
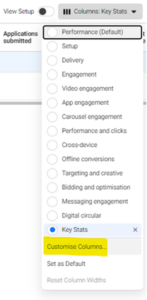
You will then be presented with all the different pieces of information that you can include in your preset. For e-commerce, you’re likely to want to look at purchase data, for example.
 How to: LinkedIn
 How to: LinkedIn
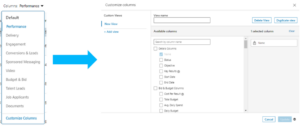
Saving Presets
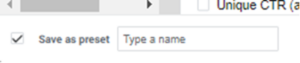
Once you’ve selected your columns you can click ‘Apply’.
However, if you’re likely to want to view the metrics regularly you’ll want to save the view. To do so, simply tick ‘Save as preset’ and name it appropriately.
Once you’ve saved the preset, you will find it in the column drop-down.
Extra hack:
If you want to save the same preset for separate ad accounts in your business manager, select your saved preset in account one, move to ad account two and save the column named ‘Custom’.

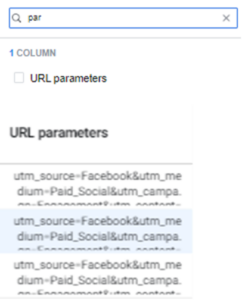
Checking URL Parameters
Another nifty Meta trick involves URL parameters
- URL Parameters are codes added to the end of your URL for tracking purposes
In some cases, you may want to check or change multiple URLs. On a large scale, this can become an extremely time-consuming task if you have to click on every single ad to see it. Instead, there is a trick that allows you to see all the URL parameters listed next to the ads so you can efficiently look for errors and differences.
How to
Repeat the first steps from saving customised columns.
In Ads Manager:
Click ‘Columns’ and select customise columns from the drop-down.
Then you type in parameters, or URL and ‘URL Parameter’ should appear.
Tick the box and apply.
All the URL parameters will then appear in your ads manager.
Don’t Double Up on Tracking Parameters
When adding URL parameters to your ads, people often add them to every link in the ad set-up. However, you only need to add it to the bottom ‘URL Parameters’ box because it automatically applies it to the other URLs. For a carousel ad, this method is particularly useful as it saves you from adding the same parameters up to 10+ times. There will be cases where you want to add individual parameters to different areas, but in general, this should help save time.
How to
The box can be found at the bottom when creating an ad. And looks like the screenshot below:

This section also has a builder which allows you to add sections instead of writing the code out. An example is displayed below.
 Watch Emil’s webinar to find out more.